File Uploads
File Transfer Protocol (FTP) is a standard method for transferring files between a local computer and a web server, making it essential for website management tasks such as uploading content, updating files, or performing backups. In cPanel, FTP allows you to efficiently manage files for your website, supporting protocols like FTP, FTPS (FTP over SSL/TLS), and SFTP (Secure FTP over SSH). Unlike cPanel’s File Manager, which requires uploading files individually, FTP enables bulk transfers, ideal for large websites or frequent updates. This guide provides step-by-step instructions for uploading files using FTP, compares FTP protocols, offers security best practices, troubleshooting tips, automation options, and integration with popular FTP clients to ensure a seamless and secure workflow.

Why Use FTP for File Uploads?
FTP is a versatile and efficient tool for website administrators, developers, and businesses managing cPanel-hosted websites. Key benefits include:
- Bulk Transfers: Upload multiple files or entire folders simultaneously, unlike cPanel’s File Manager, which is limited to single-file uploads.
- Cross-Platform Support: Works with various FTP clients (e.g., FileZilla, WinSCP, Cyberduck) on Windows, macOS, or Linux
- Secure Options: Supports FTPS and SFTP for encrypted transfers, protecting sensitive data like website code or user information.
- Automation: Enables scripted uploads for backups or scheduled updates, streamlining repetitive tasks.
- Collaboration: Allows multiple users to upload files to specific directories using dedicated FTP accounts, enhancing team workflows.
FTP vs. FTPS vs. SFTP: Choosing the Right Protocol
cPanel supports three FTP-related protocols, each with distinct features:
- FTP: Unencrypted, uses port 21, and is vulnerable to interception. Suitable only for non-sensitive data on trusted networks. What Is FTP
- FTPS: Extends FTP with SSL/TLS encryption, also on port 21, but requires additional data ports, which can complicate firewall settings. Ideal for legacy systems or Windows environments.
- SFTP: Uses SSH for encryption, operates on port 22, and is simpler to configure for firewalls. Recommended for secure, modern workflows due to its robust security and single-port design.
Prerequisites for Uploading Files with FTP
Before uploading files, ensure you have:
- cPanel Access: Log in to your cPanel account using the provided URL, username, and password from your hosting provider
- FTP Account: If you do not already have an FTP account you should create one in cPanel. How to Create an FTP Account
- FTP Client: Install a client like FileZilla, WinSCP, Cyberduck, or WS_FTP. Choosing the Right FTP Client
- Server Details: Obtain your server’s hostname (e.g.,
ftp.yourdomain.com), IP address, username, password, and port (FTP/FTPS: 21, SFTP: 22, or custom). Check your hosting provider’s welcome email. - Stable Internet Connection: Avoid network restrictions (e.g., workplace firewalls) that may block FTP ports. Troubleshooting FTP Issues
Step-by-Step Guide to Uploading Files with FTP
Step 1: Set Up an FTP Account
Create a dedicated FTP account for secure, restricted access:
- Log in to cPanel and navigate to Files → FTP Accounts.
- Under Add FTP Account, enter:
- Log In: Username (e.g.,uploader, becomesuploader@yourdomain.com).
- Domain: Select the associated domain.
- Password: Use a strong password or cPanel’s Password Generator.
- Directory: Specify a directory (e.g.,public_html/uploads) to restrict access. For main website files, usepublic_html.
- Quota: Set a limit (e.g., 1000 MB) or choose Unlimited. - Click Create FTP Account. Note the credentials for client setup.
Note: You can use your cPanel username and password for FTP access to the entire home directory without creating a new account.
Step 2: Install and Configure an FTP Client
Choose an FTP client and configure it for secure uploads. Below is an example using FileZilla:
- Download FileZilla: Get the latest version (3.67.1, 2025) from the official site. FileZilla
- Install FileZilla: Follow the installation instructions for Windows, macOS, or Linux. Set Up FileZilla
- Configure Connection:
- Open FileZilla and go to File → Site Manager (Ctrl+S).
- Click New Site, name it (e.g., “My Website”), and enter:
- Protocol: SFTP (preferred for security) or FTP with TLS (FTPS).
- Host:yourdomain.comor server IP.
- Port: 22 (SFTP) or 21 (FTP/FTPS).
- Logon Type: Normal (username/password) or Key File for SSH keys (SFTP).
- User:uploader@yourdomain.com.
- Password: Enter the account password. - In Transfer Settings, enable Passive mode for firewall compatibility.
- Click Connect. Accept host keys (SFTP) or certificates (FTPS) for trusted servers.
Other Clients:
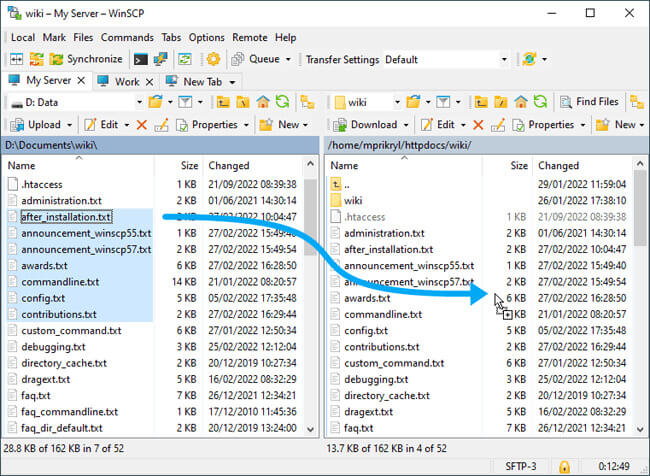
- WinSCP (Windows): Ideal for SFTP and scripting. Set Up WinSCP
- Cyberduck (macOS/Windows): Modern interface, cloud support. Set Up Cyberduck
- WS_FTP: Dual-pane interface for efficient uploads. WS_FTP Guide
Step 3: Upload Files
Once connected, upload files to the server:
- Navigate Directories: In the client, the left pane shows your local computer, and the right pane shows the server (e.g.,
/public_html). Navigate to the target directory (e.g.,public_htmlfor main website files). - Select Files: On your local computer, select files or folders to upload. For multiple files, hold Ctrl (Windows) or Cmd (macOS).
- Transfer Files: Drag and drop files to the server pane or use the client’s upload command (e.g., FileZilla: right-click → Upload; WinSCP: F5 Copy). Monitor the transfer queue for progress.
- Verify Uploads: Check the server directory to ensure files are uploaded correctly. Access your website (e.g.,
yourdomain.com/file.html) to confirm functionality.
Tip: For large files (>100MB), FTP clients like FileZilla are more reliable than web-based tools due to no upload size limits.
Step 4: Manage Uploaded Files
After uploading, manage files on the server:
- Rename/Delete: Right-click files in the client to rename or delete.
- Set Permissions: Adjust permissions (e.g.,
chmod 644for files,755for directories) to ensure accessibility. Use cPanel’s File Manager for bulk changes. - Create Directories: Create folders (e.g., WinSCP: F7 Create Directory) for organized file storage.
Security Best Practices for FTP Uploads
Protect your data during uploads with these practices:
- Use SFTP or FTPS: Avoid unencrypted FTP to prevent data interception. SFTP (SSH, port 22) is preferred for its simplicity and security. Securing FTP Transfers
- SSH Keys for SFTP: Use SSH keys for password-less authentication, configured in cPanel’s SSH Access. SSH Access Interface
- Restrict Directory Access: Limit FTP accounts to specific directories (e.g.,
/public_html/uploads) to protect sensitive areas. - Monitor Connections: Use cPanel’s FTP Connections to track and terminate active sessions, preventing unauthorized access. FTP Connections Interface
- Disable Anonymous FTP: Prevent unauthorized uploads by disabling anonymous FTP in cPanel’s Anonymous FTP interface.
- Secure Hosting: Choose a provider like RSH Web Services with free SSL, DDoS protection, and secure servers.
Warning: The FBI (2023) highlights FTP’s vulnerabilities, urging users to adopt SFTP or FTPS for secure file transfers.
Automating FTP Uploads
Automate uploads for efficiency, especially for backups or recurring tasks:
- WinSCP Scripts: Use scripts to automate SFTP uploads. WinSCP Scripting
- FileZilla CLI: FileZilla Pro supports command-line automation for scheduled uploads. Automating File Transfers
- Cron Jobs: Schedule SFTP uploads via cPanel’s Cron Jobs using SSH commands. Cron Jobs
Integrating with cPanel Features
cPanel enhances FTP uploads with powerful tools:
- FTP Accounts: Create and manage accounts with restricted access for secure uploads. Create FTP Account
- FTP Connections: Monitor and terminate active sessions to manage upload performance. FTP Connections
- Webalizer FTP: Analyze upload activity to optimize workflows or detect issues. Webalizer FTP
- File Manager: Verify uploaded files and adjust permissions for accessibility. File Manager
- SSH Access: Enable SFTP with SSH keys for secure uploads. SSH Access Interface
By mastering FTP uploads in cPanel, you can efficiently manage your website files with speed and security. Follow these steps, adopt SFTP for secure transfers, and leverage cPanel’s tools to streamline your workflow.
Related FTP Tutorials and How To Guides
Tweet Share Pin Email
Add Comment
This policy contains information about your privacy. By posting, you are declaring that you understand this policy:
- Your name, rating, website address, town, country, state and comment will be publicly displayed if entered.
- Aside from the data entered into these form fields, other stored data about your comment will include:
- Your IP address (not displayed)
- The time/date of your submission (displayed)
- Your email address will not be shared. It is collected for only two reasons:
- Administrative purposes, should a need to contact you arise.
- To inform you of new comments, should you subscribe to receive notifications.
- A cookie may be set on your computer. This is used to remember your inputs. It will expire by itself.
This policy is subject to change at any time and without notice.
These terms and conditions contain rules about posting comments. By submitting a comment, you agree with these rules:
- Although the administrator will attempt to moderate comments, not all comments can be moderated at all times.
- You acknowledge that all comments express the opinions of the original author and not those of the administrator.
- You will not post material which is knowingly false, obscene, hateful, threatening, harassing or invasive of privacy.
- The administrator has the right to edit, move or remove any comment for any reason and without notice.
Failure to comply with these rules may result in being banned from submitting further comments.
These terms and conditions are subject to change at any time and without notice.
 Choosing the Right Hosting Provider
 How to Buy IP Addresses
 How Unchecked Fraud Affects WordPress
 AI Tool Directories
Comments