What is Drupal
Drupal is an open-source content management system (CMS) designed for building and managing dynamic, flexible websites. Known for its robust architecture, it supports customizable content types, modules for extended functionality, and themes for tailored designs. Drupal’s admin interface, including tools like Configuration, Shortcuts, and Blocks, simplifies site management. With a strong global community, Drupal powers diverse sites, from blogs to enterprise platforms, offering scalability and security
Before you start to build a website with Drupal, you should first know about a few different Features. Drupal has a unique way to organize its parts, and it will be handy to know their names and what they do.
Modules
Drupal Modules enhance your website with vast functionality. Over 50,000 free modules, like Pathauto for SEO URLs, Webform for forms, or Layout Builder for drag-and-drop designs, let you customize easily via the Extend tab. Supported by a vibrant community, modules empower Drupal to create tailored, high-performance sites for e-commerce, analytics, and more.
Themes
Drupal themes transform your website’s look and feel with ease. Choose from thousands of free and premium themes on Drupal.org, like Bootstrap 4 Bootstrap 5 for responsive designs or Radix for modern layouts. Customize via the Appearance tab to match your brand. Backed by a robust community, themes ensure your site is visually stunning and user-friendly across devices, perfect for blogs, portfolios, or e-commerce.
Distributions
Drupal's distributions are pre-configured packages combining Drupal core, modules, themes, and settings for specific use cases. Available on Drupal.org, options like Open Social for community sites or Commerce Kickstart for e-commerce streamline setup. Tailored for industries like education or government, they save time while offering flexibility to customize, backed by a strong community.

Before You Start Building a Drupal Website
Before you can build your Website, you will need a good Domain Name, and a reliable hosting service.
RSH Web Services can help with this.
Domain Registration
Drupal Hosting
Install Drupal using Softaculous
You can have Drupal installed to your Website in minutes by using the Softaculous application installer in cPanel. To install Drupal using Softaculous, follow these steps:.
Log in to cPanel
After logging into cPanel, you will find the Softaculous Apps Installer link in the Software section of the Main Page.
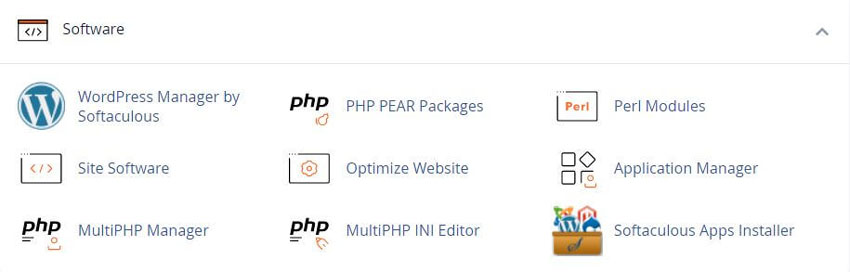
You will also see a section of the Softaculous Apps Installer, which displays the most popular applications, and the application category on the front panel.
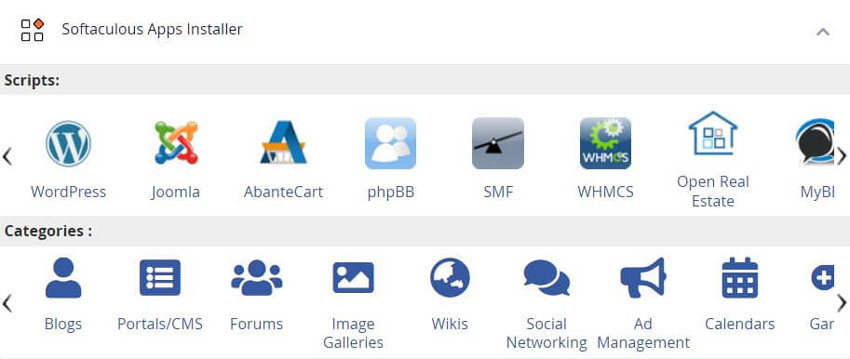
It does not matter which option you click. All start the Softaculous Installer. When you will click on Softaculous Apps Installer in the Software section, it will take you to the App installer interface.
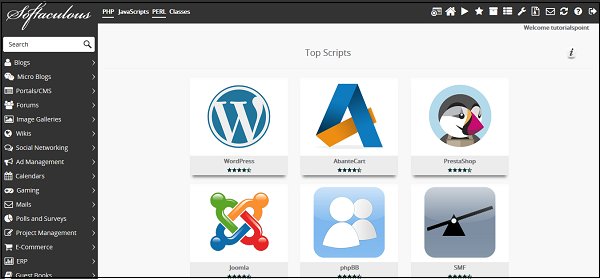
You can install, modify any installation and create as well as Manage the Backups. In the Search text box, type drupal and then press Enter. Alternatively, you can use the navigation pane on the left side. Click Portals/CMS, and then click Drupal.
Click Install. The installation page appears.
In the Choose The Version box, select which version you want to install
In the Choose Protocol box, select the protocol
You should already have an SSL certificate installed on your website. Select HTTPS
In the Choose Domain box, select the domain or accept the default value
In the In Directory box, type the directory where you want to install Drupal, or accept the default value
If you want your Domain to show by default without any /sub directory. Keep the Directory box blank
In the CRON Job text boxes, type the cron job intervals, or accept the default values.
If you are unsure of these values, just accept the default ones
In the Site Name box, type the name you would like. This will also show in the title bar of user's web browsers when they visit your site
For an example look at your Browser: Look at the top, In the Tab window for this page you should see: Using Drupal To Build a Website.
Next: In the Admin Username box, type the administrator username
Admin Password box, type the administrator password
Choose a strong password. Or you can click the Random Password.
Next type the site administrator e-mail address
You can leave the Advanced Options set as default, or change as needed
Review the installation options and settings, and then click Install
When installation is complete, Softaculous provides information about the application's configuration.

The Drupal User Interface
Drupal’s user interface offers a streamlined, intuitive experience for managing content and site settings. The admin dashboard, accessible via the toolbar, centralizes tasks like content creation, module management, and theme customization. Tools like the Block Layout and Menu interfaces simplify design and navigation setup. With a clean, responsive design and community-driven contrib modules like Admin Toolbar, Drupal’s UI empowers users to build and maintain dynamic sites efficiently.
Creating Content
Creating content in Drupal is straightforward and flexible. From the admin dashboard, use the Content menu to add pages, articles, or custom content types. Rich text editors like CKEditor enhance formatting, while fields allow structured data like images or tags. Taxonomy and menus organize content, and contrib modules like Pathauto optimize URLs for SEO. Drupal’s intuitive interface, backed by a robust community, empowers users to craft engaging, dynamic content effortlessly.
Structure
Drupal’s structure is built around a modular, flexible framework. Content is organized via nodes (e.g., pages, articles) and enhanced with custom fields and taxonomy for categorization. Menus and blocks define navigation and layout, managed through the admin interface. Entities like users and comments integrate seamlessly. Supported by Drupal’s community, this robust structure enables scalable, customized websites for any purpose.

Appearance
Drupal’s Appearance interface lets you customize your site’s look with ease. Access it via the admin toolbar to select and configure themes from Drupal.org, like responsive Bartik or sleek Claro. Adjust colors, fonts, and layouts using theme settings or custom CSS. Blocks and regions allow precise design control. Backed by a vibrant community, Drupal’s flexible appearance system ensures visually appealing, device-friendly websites.
Extend Section
The Extend section in Drupal’s admin interface is where you manage modules to enhance your site’s functionality. Access it via the toolbar to browse, install, or update over 50,000 modules from Drupal.org, like Views for custom displays or Webform for forms. Enable or configure them easily, with community support ensuring compatibility and flexibility for tailored, powerful websites.
Configuration Section
Drupal’s Configuration section, accessible via the admin toolbar, centralizes site settings management. Adjust site name, email, or regional settings, and manage content types, taxonomies, or module configurations. Use Configuration Management to export or sync settings. Backed by Drupal’s community, it ensures precise control for robust websites.
People Section
Drupal’s People section, accessed via the admin toolbar, manages user accounts, roles, and permissions. Configure user settings, like registration or email notifications, at Configuration > People > Account settings. Assign roles (e.g., Content Author, Site Manager) to control access to content or admin features. Use the People page to add users, set permissions, or manage access control. Drupal’s community-backed system ensures secure, flexible user management for tailored site administration. https://www.drupal.org/docs/7/understanding-drupal/users-permissions-and-roles
Reports Section
Drupal’s Reports section, accessible via the admin toolbar, provides insights into your site’s performance and status. View logs, recent errors, or available updates for core and modules under Reports > Recent log messages or Updates. Monitor site usage, track 404 errors, or review search terms with contrib modules like Statistics. Backed by Drupal’s community, the Reports section ensures you stay informed to maintain a secure, optimized website.
Help Section
Drupal’s Help section, found in the admin toolbar, offers guidance for managing your site. Access built-in documentation, tutorials, and tips for core features like content creation or module configuration. Contrib modules like Admin Toolbar enhance navigation to help resources. Backed by Drupal’s community, it links to Drupal.org for extensive support, ensuring users can effectively build and maintain their websites.
Shortcuts
Drupal’s Shortcuts, accessible via the admin toolbar, streamline navigation to frequently used tasks. Add custom shortcuts for actions like creating content or managing modules through the Shortcuts menu. Edit or reorder them for efficiency. Contrib modules like Admin Toolbar enhance shortcut functionality. Supported by Drupal’s community, shortcuts simplify site management for faster, tailored workflows.

Drupal Themes
Drupal themes shape your site’s visual style and layout.
You will notice at the bottom you see your website. Looks rather plain? You will want to change the default theme that your site comes with to something better. You find an option for this under Appearance > Install New Theme.
You will not find themes from inside the Drupal Control Panel. Go to the official Drupal theme directory, for which you also find a link at the top of the theme installation page.
Not only that, but you have a choice of more than 2,700 themes. The directory gives you several ways of filtering them, so you can find what you are looking for.
When choosing a theme, make sure it fits your level of technical ability and one that is mobile responsive. When you have found the right one, installing it to your Website.
Either download the theme from the directory (you find options at the bottom) or right-click the download link and copy its location.
After that, you can use either the file or the URL to upload the theme to your site.
Install it from the Appearance tab and Set as Default to use it.
When this is done, and you go back to your Website (there is a button in the upper left corner), you will now see the new Theme.
Configuring Themes
Once you have installed the Theme, click on the Appearance menu at the top. Most themes come with configuration options that you can access by clicking the Settings link next to them. Alternatively, use the Settings tab on top and then pick the theme that you want to edit.
Here you are able to make any changes the Theme has and, depending on your theme, even preview it at the same time. Change the color scheme. Enable disable user pictures. Upload logos and favicons. Set backgrounds and much more, so you can take advantage of everything your theme has to offer.
Create a New Front Page
To create a front page so that visitors are able to see something.
Go to Content > Add Content > Basic Page.
Here, you are able to create or edit content with a basic editor. At the top, you have the option to define a Page Title that will also appear on your Website.
Below that, you will find a link Edit Summary When you click it, it gives you the option to provide a summary for your post or page.
This is kind of like an excerpt that will appear in certain parts of your site.
Below that, there is the option to input and format the body text. For example, you can make the text bold and italic, add and remove links, create lists, define block quotes, insert images and use the drop-down menu to define headings. Additional options such as inputting tables or horizontal dividers are available when you switch to Full HTML at the bottom.
Make sure that on the right side under URL Alias, you define a slug or URL ending for your page.
At the bottom, save the post and make sure that the box before Published is checked.
In order to define your new page as the front or Index page, you have to go to Configuration > System > Basic Site Settings > Default Front Page. Type in the same Title that you just defined for your new page.
Once you have done that and saved the configuration, your content should show up on the front page of your Drupal site.
Create A Page With Menu
As a next step, we now want to create an About page and add it as a menu item. The first few steps are the same as before. Create a basic page, populate it with content and set a slug, e.g. /about.
But before publishing, make sure to click on Menu Settings and tick the box that says Provide a Menu Link.
The settings that appear are.
Menu link title
This is the text of the link that users will see in the navigation menu. Make it something instantly recognizable. In this case, About Me is a good choice.
Description
An optional description that will appear when someone hovers their mouse over the menu link. It can say something like: Find out more about what I have to offer.
Parent item
If you have other menu items already, this setting allows you to create sub-items.
Weight
With this setting, you can determine the order of your menu items. The higher the number, the further in front they will appear.
Once you are satisfied with your settings, click Published.
Drupal should automatically take you back to your front end, where you will see both your new page and the new menu item.
If the menu is in the wrong order, simply hover over it and then click the pen icon that appears, then choose Edit Menu.
Here, you can simply drag and drop the menu items into the order that you want via the icon on the left. Save when you are done with the changes to your site.
You can also use the Add Link button on top to manually add more pages to the navigation menu.

Activate and Deactivate Default Modules
You should have a basic understanding of how to get around Drupal. This system can do a lot more and be extended for any type of purpose.
For that, you will most likely use modules that can add all sorts of features and functionality to your Drupal site.
Drupal comes loaded with Modules, which you can find under Extend.
Not all the modules will be installed and active by default. To change that, simply tick the box in front and then scroll down and click Install".
And any modules you no longer need, you can get rid of under the Uninstall tab.
Add New Modules
Besides the default modules, there are also a lot of others available from other developers. Adding them to your site very much works like installing themes.
First, you need to find modules you like in the official directory. Once you have settled on one, either download it or copy its location. You can then add it to your site via Extend > Install New Module.
There are a lot more modules to choose from than themes, 42,000+. If you are not sure which of them make sense to install, here are a few great options:.
Administration Menu
With the default toolbar, you’ll waste time loading a ton of pages just to get to a single admin function. To speed things up, this module gives you cool drop-down menus for the entire admin area. Simply turn off the existing toolbar, then activate the Administration Menu module.
Token
Tokens are little sections of text placed via a placeholder system. By now, much of the functionality of the Token module has been written into Drupal core, but some modules still require it, like the Pathauto module.
Chaos Tools Suite
AKA Ctools, allows you to create your own modules as well as forms, dialogue boxes, pluggable content types and more.
Pathauto
Drupal’s built-in Path module lets you create URLs by hand. This is annoying to do manually for every post and Pathauto relieves you of that drudgery. You can assign custom replacement patterns and user account page paths so the URLs match your SEO and usability standards. Remember: Pathauto requires the Token and Ctools module.
Quick Tabs
Have you ever seen those cool tabbed boxes on big websites that list recent and popular content? Quick Tabs can do a lot of this easily without writing custom JavaScript. After installing and enabling the module, you’ll find a Quick Tabs selection under the Structure menu.
Get Familiar with Blocks
Drupal Blocks are versatile content units that enhance your website’s layout. Placed in regions like headers, sidebars, or footers via the Block Layout interface, they display menus, custom text, or dynamic content like recent posts. Create custom blocks or use contrib modules like Views for advanced functionality. Supported by Drupal’s community, blocks offer flexible, reusable design elements for tailored, engaging sites.
Depending on your theme, modules and other components on your site, you will have access to different kinds of blocks. You can find all the options for managing them under Structure > Block Layout.
Blocks are saved by theme, so at the top you find a list of the themes that are installed on your site. Below that is a list of all the places you can add blocks to, called Regions. If you are not sure where all of them are, click the Demonstrate Block Regions at the top. You will then see a view of your site with highlights and labels for where each block region is.
To add a one somewhere, simply scroll to the desired region and click Place Block. This will give you a list of available options.
When you click Place block next to the one you want on your site, you then get to the configuration options.
These will be slightly different depending on what you are placing. In this case, you are able to add a title (and determine whether to show it) and configure the visibility of the block. For example, you can restrict it to show up only for certain content types, on particular pages or depending on the role of the active user. At the bottom, you are also able to change the region where you want it to appear (in case you picked the wrong one).
Once satisfied, click Save block, this will add it to your Website.

Manage Existing Blocks
Of course, you can also change anything you want about blocks that already show up on your site. Use the drop-down menu under Region to move them to another location.
On the right, a click on Configure, this lets you access the block settings from before in order to change them. If you click on the arrow icon instead, you get the option to disable or completely remove blocks.
When you have made changes, don’t forget to save them at the bottom of the screen.
You can also edit particular blocks from the front end of your site. Hover over any of them so that the pen icon appears, click it, and then do a second click on Configure block. Here, you are able to change any settings, assign them to a new region and also remove blocks.
Create Custom Blocks
You can also create your own custom blocks. For example, you have information that you want to display in different areas of your site.
Go to Structure > Block Layout > Custom Block Library > Add custom block.
Enter a block description so that you and other administrators know what it is about. Then, enter the content you want the block to display in the editor below.
Once you are done, save your custom block. When you do, you can then assign it to different regions on your site in the same way as other blocks.
Drupal’s Showcase Of Websites
Drupal’s collection of showcased websites highlights the platform’s flexibility, supporting everything from personal profiles to expansive enterprise solutions. A wide range of prominent organizations and businesses rely on Drupal for its powerful content management, strong security, and capacity to manage complex data and high-traffic environments.
NASA
A content-rich portal built on Drupal 7, offering news, media, and educational resources with high Security for millions of daily users.
The White House
A secure, government-focused site using Drupal for robust content management and accessibility across diverse audiences.
Tesla
Showcases electric vehicles with a sleek, multilingual design, leveraging Drupal’s API-first architecture for seamless content delivery
Arsenal FC
A dynamic sports site with Drupal 8, featuring news, ticket services, and live match updates, utilizing standard modules like Blocks and Views.
The British Royal Family
A multilingual, content-heavy site with news and search features, built on Drupal for fast loading and accessibility.
Sevilla FC
A vibrant sports site using Drupal 8 for rich media, merchandise, and multilingual content management across 14 languages.
Princeton University
A scalable academic site using Drupal for complex content needs, supporting multiple audiences with flexible publishing
Le Figaro
France’s oldest national newspaper, using Drupal for fast-loading, media-rich content with feeds and live video features
Emmy Awards
A Drupal 7 site for the TV industry, offering fast-loading, content-dense pages with links, media, and event schedules
Children’s Society
A nonprofit site with Drupal, featuring animated, user-focused design for fundraising and community engagement.
Summary
Drupal’s powerful ecosystem, modules, themes, distributions, and intuitive admin tools like Configuration and Shortcuts, empowers users to build dynamic, tailored websites. Backed by a vibrant community, Drupal’s flexibility ensures scalable, visually appealing sites for any purpose, from blogs to e-commerce.
While the above information is enough to give you a solid foundation for building a website with Drupal, keep in mind that it takes time to harness its power. Play around with the tools and system and figure out how to implement things you want on your Website.
However, if you want a more systematic approach to learning about Drupal, the following resources are really helpful.
Drupal 8 Theming, YouTube Video.
Drupal 8 Beginner Tutorials YouTube Video.
Drupal is a powerful content management system and a great way to build your own website. It has all the features you need for simple and the most complex Websites, is free, flexible, customizable, scalable and well-supported.
And RSH Web Drupal Hosting Services
Author Bio: Mark Cole
Digital content writer with a passion for crafting engaging and informative copy. With over 9 years of international copy writing experience and...
We'd love to hear from you! Leave your experiences or questions in the comments section below.
Add Comment
This policy contains information about your privacy. By posting, you are declaring that you understand this policy:
- Your name, rating, website address, town, country, state and comment will be publicly displayed if entered.
- Aside from the data entered into these form fields, other stored data about your comment will include:
- Your IP address (not displayed)
- The time/date of your submission (displayed)
- Your email address will not be shared. It is collected for only two reasons:
- Administrative purposes, should a need to contact you arise.
- To inform you of new comments, should you subscribe to receive notifications.
- A cookie may be set on your computer. This is used to remember your inputs. It will expire by itself.
This policy is subject to change at any time and without notice.
These terms and conditions contain rules about posting comments. By submitting a comment, you agree with these rules:
- Although the administrator will attempt to moderate comments, not all comments can be moderated at all times.
- You acknowledge that all comments express the opinions of the original author and not those of the administrator.
- You will not post material which is knowingly false, obscene, hateful, threatening, harassing or invasive of privacy.
- The administrator has the right to edit, move or remove any comment for any reason and without notice.
Failure to comply with these rules may result in being banned from submitting further comments.
These terms and conditions are subject to change at any time and without notice.
Tweet Share Pin Email
 What Is and Using Two Factor Authentication
 How Strong Passwords Improve Your Online Security
 Best Practices to Keep Your Mobile Workforce Safe
 How to Create a Safe Virtual Environment for Your Business
Comments