
cPanel / Softaculous Tutorials & Guides
cPanel - Softaculous - Push to Live
Push to Live applies selected staging changes to a live installation. Because this can replace production files or database content, this guide emphasizes choosing the correct source and destination, reviewing the available options, and checking the live result afterward.
After you’ve created a staging copy of your website and tested updates or redesigns, the next essential step is deploying those changes back to your live site. Softaculous includes a Push to Live feature that simplifies this process, allowing you to replace files and databases with staging versions via a clear workflow. This guide walks through the Push to Live management process so you can confidently update production installations without breaking your live environment.
What Push to Live Does
The Push to Live feature takes all approved changes from a staging installation and applies them to the live version of your site. This is useful when you’ve tested new plugins, layout changes, or core updates on a staging environment and are ready to deploy those improvements without downtime or risk to the live site. Not all applications support this feature, so ensure your script appears with Push to Live options in Softaculous before attempting it.
Before You Begin
Use this only when the staging installation is eligible and has been tested. Make a current production backup, record any content changed on live, and schedule the operation when you can verify the site.
Deployment Process
Softaculous follows a structured sequence to push staging site changes back to live. Below is the typical process you would follow in most hosting control panels using Softaculous.
1. Open Softaculous in cPanel
Log into your cPanel
Click the Softaculous App Installer link in the Software section.
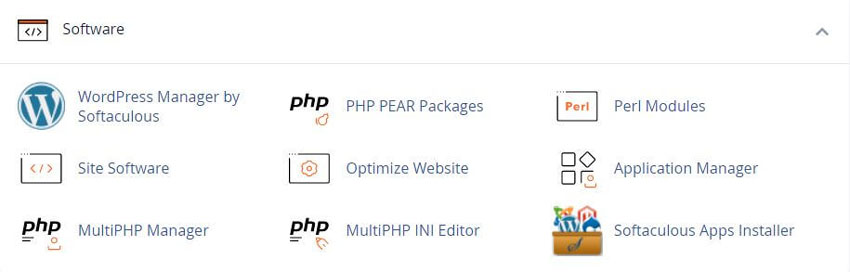
2. Access Your Hosting Panel
Open Softaculous Apps Installer to view all current installations.
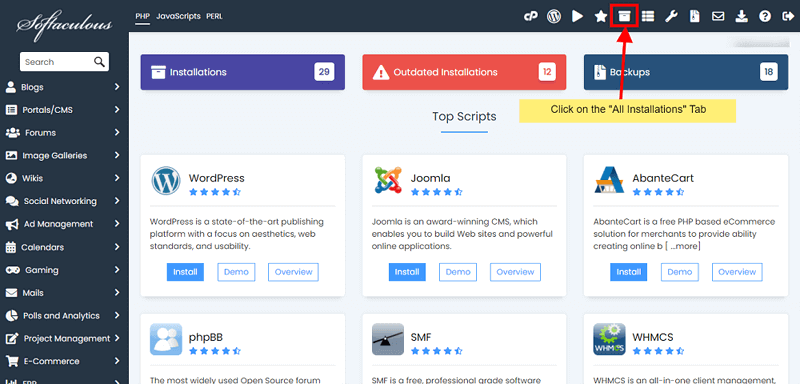
3. Select the Staging Site
Locate your staged installation in the list and click the Push to Live icon next to it. This launches the push configuration page.
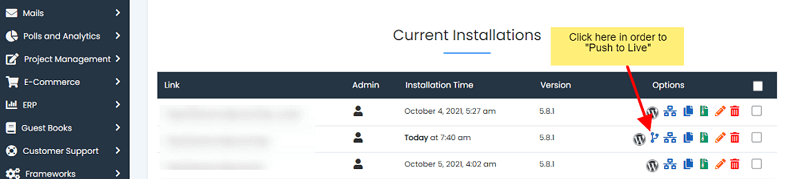
4. Choose Deployment Type and Verify
Softaculous offers Default and Customize tabs. Default pushes everything from staging to live, including replacing all files and the database. Customize lets you select only specific elements to push.
After choosing options, click the Push to Live button. Softaculous will update the live environment based on your choice.
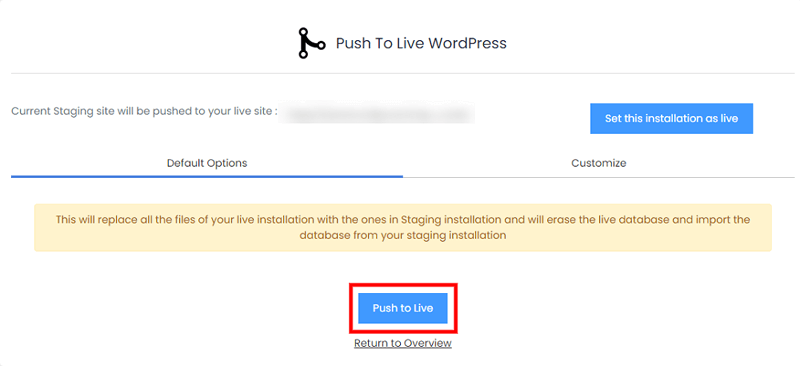
When the process completes, confirm that your live site reflects the changes and functions as intended.
Push to Live Options Explained
You can control what parts of the staging site you want to push to live. Softaculous provides selections so you don’t have to overwrite everything if you don’t want to.
Files Only
Push only the website files, useful when layout or code changes are made without altering the database.
Full Database
Replace the entire live database with the staging database, which is ideal when content and structure updates need deployment.
Database Structure Only
Apply structural database changes without moving data, helpful when schemas change but content remains separate.
Only Table Data
Push just the data portion of your database without adjusting the schema.
Best Practices for Push to Live
Before pushing changes, always back up your live site. This ensures you can revert if something goes wrong during the push. Only deploy database changes when you are certain that staging reflects all updates you need in production. After pushing, thoroughly test live functionality to confirm everything works correctly.
Using Softaculous to push staging changes live helps streamline your workflow and keeps development increments controlled and safe. Taking advantage of the customization options ensures that only necessary components transition from staging to production.
Frequently Asked Questions
What is the difference between cloning and staging?
Cloning creates a separate copy of an installation. Staging is a workflow intended for testing changes away from the live site and may provide additional deployment controls. Compare the clone guide and the staging guide. The available behavior depends on the application and Softaculous configuration. Use the page for the feature that appears for your installation, and verify the destination before testing.
Will a clone change the live site?
A correctly configured clone is created at a separate destination, so it should not replace the source installation. The destination can still affect visitors if its domain is public, and some applications need URL or configuration adjustments. Record the source and destination clearly, then open the copied site and verify its links before making changes. Push to Live is the control that writes staging work back to production after testing.
Do I need a backup before cloning?
A backup is prudent before cloning a production installation, especially when the source is large or actively changing. Cloning normally creates another copy, but storage limits, database work, and application-specific behavior can still cause an incomplete operation. Keep the source available and do not delete it until the copy has been checked. Before a push, also follow the Softaculous backup guide.
Why is Clone unavailable?
Clone is not available for every script or every installation. Softaculous may also require the application to be recognized and the server administrator to permit the feature. Check the installation’s available icons in the All Installations list and the official Softaculous documentation. If the option is absent, do not assume that a manual copy will behave identically.
What should I check on the cloned site?
Open the destination URL, sign in to its administration area, test representative pages, inspect media and links, and confirm that forms or integrations are not still pointed at production. For WordPress, pay particular attention to site URLs, scheduled tasks, email, analytics, and search-engine visibility before exposing the copy publicly. WordPress-specific panel tools are covered in the WordPress Manager guide.
Can I use a clone as a permanent second site?
A clone can be a starting point for a separate site, but it may retain production settings, content, credentials, and third-party connections. Review those items before treating it as independent. Confirm the application license and hosting requirements, change what should differ, and keep the two sites’ maintenance responsibilities separate.
Does cloning copy email accounts?
Cloning an application generally concerns the supported installation files and database, not the entire hosting account. Mailboxes, DNS, server-level settings, and unrelated account data may remain outside the clone. Verify what the Softaculous operation reports and handle email migration separately when the project requires it. Operation notices can be reviewed in the email settings guide.
How do I remove a test clone safely?
Identify the test domain or directory and confirm it is not the live installation. Preserve any data you still need, then use the appropriate Softaculous or hosting control-panel removal method. If you need the copy later, use the restore a backup guide. Check DNS, cron jobs, remote integrations, and databases afterward so that deleting the copy does not leave unwanted account resources behind.
Related Softaculous Tutorials and How To Guides
Wide range of key features for website management
Softaculous End-user Documentation
See our WHMCS cPanel Knowledgebase add-on module for Hosting Companies
Covering cPanel, WordPress, FTP and Softaculous
Related cPanel Tutorials and How To Guides
A beginners guide to cPanel Step by step tutorials
Tweet Share Pin Email
Add Comment
This policy contains information about your privacy. By posting, you are declaring that you understand this policy:
- Your name, rating, website address, town, country, state and comment will be publicly displayed if entered.
- Aside from the data entered into these form fields, other stored data about your comment will include:
- Your IP address (not displayed)
- The time/date of your submission (displayed)
- Your email address will not be shared. It is collected for only two reasons:
- Administrative purposes, should a need to contact you arise.
- To inform you of new comments, should you subscribe to receive notifications.
- A cookie may be set on your computer. This is used to remember your inputs. It will expire by itself.
This policy is subject to change at any time and without notice.
These terms and conditions contain rules about posting comments. By submitting a comment, you agree with these rules:
- Although the administrator will attempt to moderate comments, not all comments can be moderated at all times.
- You acknowledge that all comments express the opinions of the original author and not those of the administrator.
- You will not post material which is knowingly false, obscene, hateful, threatening, harassing or invasive of privacy.
- The administrator has the right to edit, move or remove any comment for any reason and without notice.
Failure to comply with these rules may result in being banned from submitting further comments.
These terms and conditions are subject to change at any time and without notice.
 What is ConfigServer Security and Firewall
 Effective DDoS Protection Strategies for Website Security
 What Are SSD Drives and Their Benefits for Website Hosting?
 Best Hosting Service and Free Domain Names
Comments