Adding Images in WordPress
Images play a crucial role in web design and content creation. They can make your website visually appealing, enhance user engagement, and even improve your site's SEO. In this comprehensive guide, we’ll explore how to add images in WordPress, optimize them for performance, and utilize them effectively for better user experience and SEO.
Why Images Matter in WordPress
Incorporating high-quality images thoughtfully can significantly enhance your site’s overall effectiveness. Here are a few more reasons why they are essential for your WordPress site
- • Visual Appeal: Images attract attention and can make your content more engaging. They break up text and help convey your message more effectively.
- • SEO Benefits: Properly optimized images can enhance your SEO. Search engines consider image alt texts and file names when indexing content.
- • Improved User Experience: Quality images can make your site easier to navigate, helping visitors find information quickly.
- • Brand Identity: Images can convey your brand’s message and personality, making your site more memorable.
- • Content Breaks: Images provide visual breaks in text-heavy content, making it easier for readers to digest information.
- • Storytelling: Images can help convey your message more effectively, complementing your text and adding context or emotion.
- • Social Sharing: Visual content is more likely to be shared on social media, increasing your site's reach and traffic.
- • Accessibility: Images can enhance understanding for users with different learning styles, as they can provide additional context or information.
Types of Images You Can Use in WordPress
Understanding the types of images you might want to use can help you choose the right format:
- • JPEG: Great for photographs and images with gradients. They balance quality and file size.
- • PNG: Ideal for images that require transparency or text. They typically have larger file sizes compared to JPEGs.
- • GIF: Best for short animations. They support transparency but have limited colors.
- • SVG: Scalable vector graphics are ideal for logos and icons. They retain quality at any size but may not be suitable for all types of images.
- • WebP: A modern format that provides excellent quality at smaller file sizes, ideal for web use.
How to Add Images in WordPress
Adding images to your WordPress site is straightforward. Determine where you’d like to insert your image in your post.
Above the Post editor toolbar, you will see an Add Media button. Click the "Add Media" button, and you’ll see the "Insert Media" box.
Here’s a step-by-step tutorial for beginners:
- • Log into Your WordPress Dashboard: Open your browser and log in to your WordPress admin area by visiting yourwebsite.com/wp-admin.
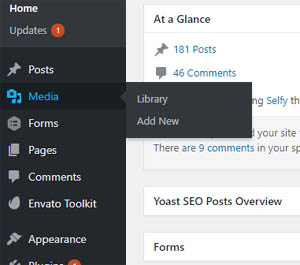
- • Navigate to the Media Library: In the dashboard menu, go to Media > Library. This is where all your uploaded images are stored.
- • Upload a New Image: Click on the Add New button at the top of the page.
You can either drag and drop files directly into the upload area or click the Select Files button to choose images from your computer.
Editing Image Details
Once your image is uploaded, you’ll see it in the media library. Click on the image to open the Attachment Details panel on the right. Here you can edit:
- • Title: The name of the image. This is often displayed in the media library.
- • Caption: A short description that appears below the image on your website.
- • Alt Text: A crucial field for SEO; it describes the image for search engines and improves accessibility for visually impaired users.
- • Description: Additional information about the image. This can also help with SEO but is less commonly used.
Inserting Images into Posts or Pages
- • Using the Classic Editor: Open the post or page where you want to add an image. Place your cursor where you want the image to appear. Click on the Add Media button above the editor. Select the image from your media library or upload a new one. Choose your desired alignment (left, center, right, none) and click Insert into post.
- • Using the Gutenberg Block Editor: Open the post or page where you want to add an image. Click on the + icon to add a new block. Select the Image block. Upload a new image or select one from your media library. After inserting, you can adjust alignment and add a caption directly in the block.
Optimizing Images for WordPress
Adding images is just the first step; optimizing them is crucial for site performance and SEO. Here are some best practices:
- • Resize Images: Before uploading images, make sure they are appropriately sized. Large images can slow down your website. You can use tools like Adobe Photoshop, GIMP, or online services like TinyPNG to resize images.
- • Use Descriptive Filenames: Rename your image files to something descriptive. Instead of "IMG_1234.jpg," use a name like "blue-widget-product.jpg." This helps search engines understand what the image is about.
- • Write Effective Alt Text: Write clear and concise alt text that describes the image. Aim for 125 characters or fewer, and include relevant keywords when appropriate, but avoid keyword stuffing.
- • Compress Images: Image compression reduces file size without sacrificing quality. Use plugins like Smush, Imagify, or ShortPixel to automatically compress images upon upload.
- • Choose the Right Format: Select the appropriate file format based on the type of image. Use JPEG for photos and PNG for images with text or transparency.
- • Implement Lazy Loading: Lazy loading is a technique that loads images only when they are visible in the viewport. This can improve page load times. WordPress has built-in lazy loading for images since version 5.5, but you can also use plugins like a3 Lazy Load for more control.
Adding Featured Images
A featured image is a representative image for your post or page. It often appears on the blog index page, social media shares, and in various widgets.
- • Set a Featured Image: In the post or page editor, look for the Featured Image box on the right side.
- • Click on Set featured image: Upload a new image or select one from your media library.
Click Set featured image to confirm. Ensure that your featured image follows the same optimization practices as other images: appropriate size, descriptive filename, and alt text.
Using Images in Widgets
Widgets can also display images in various areas of your site, like sidebars and footers. Go to Appearance > Widgets in your dashboard. Choose the area where you want to add an image. Drag the Image widget into your chosen area. Upload an image or select one from your media library. Add a title, caption, or link if needed, and click Save.
Embedding Images from External Sources
You can also embed images hosted on other websites, like social media platforms or image-sharing sites.
- • Copy the Image URL: Right-click on the image you want to embed and select Copy Image Address or similar, depending on your browser.
- • Insert the Image in WordPress: In the post or page editor, add an Image block. Instead of uploading, paste the copied URL into the block. Click Insert to add the image to your content.
Troubleshooting Common Image Issues
Even with a solid understanding of how to add images, you may encounter some common issues:
If an image does not appear on your site, check the following:
Ensure the image is uploaded correctly in the media library. Verify that you have the correct URL. Clear your browser cache and refresh the page.
Slow Page Load Times
If images are causing slow load times, consider:
- Compressing images before upload.
- Resizing images to the appropriate dimensions.
- Implementing lazy loading.
Broken Links
If you delete an image from the media library after linking to it, you’ll end up with a broken link. Make sure to check your posts and pages for broken links regularly.
There are numerous plugins available for link checking
Best Practices for Using Images in WordPress
To maximize the effectiveness of images on your site, follow these best practices:
- • Use High-Quality Images: Always opt for high-resolution images that are visually appealing. Blurry or pixelated images can detract from your site's professionalism.
- • Maintain Consistency: Stick to a consistent style for images throughout your site. This includes color schemes, image sizes, and filter effects.
- • Balance Text and Images: While images are essential, don't overload your pages with them. Balance text and images to ensure readability and engagement.
- • Test for Responsiveness: Ensure that images look good on all devices. Test your site on mobile, tablet, and desktop views to check how images resize.
- • Stay Legal: Make sure you have the right to use any images on your site. Use royalty-free images from sources like Unsplash, Pexels, or Pixabay, or create your own images.
WordPress Image Plugins
Imagify
The Best Image Optimization Plugin For WordPress. Imagify is the most advanced image optimization plugin to help you resize and compress images. You can now use its power directly in WordPress to optimize images and reduce the weight of the photos you want to add to your site
Smush Image Optimization
Smush is the leading image optimization plugin - optimize, resize, and compress images, as well as convert images to WebP format for faster loading web pages.. Brought to you by the WPMU DEV team
WP-Optimize
WP-Optimize brings the best cache and optimization technology together into one single, seamless plugin to make your WordPress site fast, lean and efficient
EWWW Image Optimizer
With EWWW IO you can optimize all your existing images, from any plugin, and then let EWWW IO take care of new image uploads automatically
Converter for Media
New images that will be added to the Media Library will be converted automatically. Our image optimizer does not modify your original images in any way. This means security for you and your files
Modula Image Gallery
With Modula, building stunning lightbox galleries, masonry grids, custom grids, and more is easier than ever with a few clicks from the WordPress Dashboard.
Perfect Images
This powerful plugin helps you optimize and manage your images with ease. Manage Image Sizes, Thumbnails, Easily replace or regenerate existing images in bulk, set custom sizes, improve performance, and create retina versions for high-quality displays
Image Optimization by Optimole
a cloud-based solution that compresses, resizes, and converts images to WebP and AVIF formats. It also supports lazy load, CDN, DAM, watermarks, and more features to speed up your website and improve image qualit
Image Hotspot
Elevate your visuals with Devvn Image Hotspot! Transform ordinary images into interactive experiences by adding customizable hotspots. Engage your audience with tooltips, links, and more
ShortPixel Image Optimizer
Optimize images and PDFs smartly. Create and compress next-gen WebP and AVIF formats. Smart crop and resize. By ShortPixel - Convert WebP/AVIF and Optimize Images
Default featured image
Add a Default Featured Image for all posts and pages. By Jan Willem Oostendorp
Auto Image Attributes
Automatically Add Image Title, Caption, Description And Alt Text From Filename. Includes a bulk updater to update existing images in the Media Library. By Arun Basil Lal
 WordPress Resources and Links
Developers WordPress.org
Explore WordPress development with our comprehensive guides and resources. Learn to create themes, plugins, and optimize your site
Security WordPress.org
Discover WordPress Security best practices to protect your site. Learn about updates, secure hosting, and essential plugins to keep your content safe from threats
Themes WordPress.org
Browse thousands of free WordPress themes to customize your site’s look. Find the perfect design for your blog, business, or portfolio, and enhance your site’s functionality
Plugins WordPress.org
Unlock your site's potential with thousands of free WordPress plugins! Enhance functionality, improve performance, and add features easily. Explore, install, and elevate your website
Widgets WordPress.org
Discover WordPress widgets to customize your site’s layout easily! Add functionality and content in sidebars and footers without coding
Codex WordPress.org
Explore the WordPress Codex for comprehensive documentation and tutorials. Find guides on themes, plugins, and customization to help you master WordPress
Online Courses WordPress.org
Explore free WordPress courses designed for all skill levels! Learn about themes, plugins, and site management through structured lessons to boost your skills and create stunning websites
Community WordPress.org
Join the WordPress community! Collaborate with passionate contributors, share ideas, and help shape the future of WordPress. Get involved in events, discussions, and projects today
WordPress Resources RSHWeb.com
RSH Web Services complete WordPress resources. Our blog helps you find WordPress Resources like optimize your site, improve performance, and master all things WordPress
Summary
Adding images in WordPress is a vital skill that can significantly enhance your website’s appeal and functionality. By following the steps outlined in this guide, you’ll be able to upload, optimize, and utilize images effectively, improving both user experience and SEO.
Always remember the importance of optimization. Well-optimized images can enhance your site's speed and search engine rankings, helping you reach a wider audience. With the right techniques, you can create a visually stunning website that resonates with your visitors.
Also see: Using WordPress To Build A Website
Installation with cPanel and Softaculous. WordPress Themes. Changing Themes. Plugins, Creating New Pages. Appearance, Step by step guide, more
Overwhelmed With WordPress?
If WordPress is a bit much try our new AI Website builder and Website Importer
Author Bio: Mira Calden
A WordPress wizard with over eighteen years of experience designing, optimizing, and troubleshooting sites on the world’s favorite CMS WordPress....
Related WordPress Tutorials and How To Guides
Tweet Share Pin Email