
Using the WordPress Media Library
The WordPress Media Library contains all the files you uploaded to your WordPress site, A virtual repository of all media files types such as images, videos, audio, and other documents that you can use on your site. It allows you to upload and manage media files, insert them into posts and pages, and even quickly edit on the go. Understanding how to effectively use the Media Library can enhance your website's functionality and improve the overall user experience. In this guide, we will explore the features of the Media Library, how to manage media files, and best practices for optimizing your media content.
What is the WordPress Media Library?
The WordPress Media Library is a built-in feature that allows you to upload, organize, and manage all your media files in one place. Whether you’re a blogger, a business owner, or a content creator, the Media Library simplifies the process of adding multimedia content to your posts and pages.
Key Features of the Media Library
- • Upload Media Files: Easily upload images, videos, audio files, and documents directly to your website.
- • Organize Files: Use categories and tags to keep your media files organized and easily accessible.
- • Edit Media: Make basic edits to your images, such as cropping, resizing, and rotating.
- • Search and Filter: Quickly find specific media files using the search bar and filter options.
- • Embed Media: Insert media files into your posts and pages with just a few clicks.
How to Access the WordPress Media Library
To access the Media Library in WordPress, follow these simple steps:
- • Log In to Your WordPress Dashboard: Visit yourwebsite.com/wp-admin and enter your login credentials.
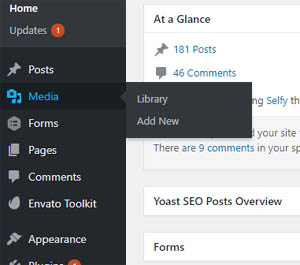
- • Navigate to Media: In the left-hand menu, click on Media. Here, you’ll see two options: Library and Add New.
Uploading Media Files
Step 1: Upload Media Using the Library
- • Go to Media Library: Click on Media > Library.
- • Add New Files: Click the Add New button at the top of the page.
- • Upload Files: You can either drag and drop files directly into the upload area or click the Select Files button to choose files from your computer.
Upload Media Directly in the Post Editor
You can also upload media files while creating or editing a post:
- • Open a Post: Go to Posts and select the post where you want to add media.
- • Add Media: Click on the Add Media button above the editor.
- • Upload or Select Files: Choose to upload new files or select existing files from the Media Library.
Managing Your Media Library
Once you’ve uploaded files to the Media Library, it’s essential to manage them effectively. Here are some tips on how to organize and manage your media files.
- • Folders and Categories: While WordPress does not have a built-in folder system for organizing media files, you can use plugins like WP Media Folder or FileBird to create a folder structure. Alternatively, use descriptive filenames and categories to keep your media organized.
- • Tags: Use tags to categorize media files further. This helps in filtering and searching for specific items later.
- • Editing Media Files: WordPress allows basic editing of images directly in the Media Library
- • Select an Image: Click on the image you want to edit.
- • Edit Image: Click on the Edit Image button in the Attachment Details panel.
- • Use Editing Tools: You can crop, rotate, flip, and resize the image. After making changes, click Save to apply them.
- • Deleting Media Files: To delete a media file, follow these steps:
- • Select the File: Click on the image or media file in the Media Library.
- • Delete Permanently: In the Attachment Details panel, click on the Delete Permanently link.
- • Bulk Actions: You can manage multiple files at once using bulk actions:
- • Select Multiple Files: In the Media Library, check the boxes next to the files you want to manage.
- • Choose Bulk Actions: Select actions such as Delete Permanently from the dropdown menu and click Apply.
Optimizing Media for SEO
Optimizing your media files can significantly improve your website’s SEO performance. Here are some essential tips for optimizing images and other media files:
- • Use Descriptive Filenames: Before uploading an image, rename the file with relevant keywords. For example, instead of "IMG_1234.jpg," use "blue-widget-product.jpg." This helps search engines understand what the file contains.
- • Add Alt Text: Alt text (alternative text) describes the image for search engines and improves accessibility.
- • To add alt text: Click on the image in the Media Library. Select an Image. In the Attachment Details panel, enter a concise and descriptive alt text in the Alt Text field.
- • Optimize Image Size: Large image files can slow down your website. Use tools like TinyJPG or TinyPNG to compress images before uploading them. You can also use WordPress plugins like Smush or Magify for automatic optimization.
- • Choose the Right Format: Select the appropriate file format based on the type of image. JPEG is ideal for photographs, while PNG works better for images that require transparency. For animations, use GIF.
- • Use Image Sitemaps: Creating an image sitemap can help search engines index your images. Many SEO plugins, like Yoast SEO, automatically generate sitemaps that include images.
Embedding Media Files
WordPress makes it easy to embed various types of media files, including videos, audio, and documents.
- • Embedding Videos: To embed videos from platforms like YouTube or Vimeo. Copy the Video URL: Go to the video on the platform and copy the URL.
- • Paste the URL in WordPress: In the post or page editor, paste the URL directly. WordPress will automatically convert it into an embedded video.
- • Adding Audio Files: You can upload audio files directly to the Media Library or embed them from services like SoundCloud
- • Upload Audio File: Go to Media > Add New and upload your audio file.
- • Embed Audio: In the post editor, click on Add Media, select the audio file, and insert it into the post.
Troubleshooting Common Media Library Issues
As you use the Media Library, you may encounter a few common issues. Here’s how to resolve them:
- • Image Not Displaying: If an image is not showing on your site, check the following: Ensure the image was uploaded correctly in the Media Library. Confirm that you have the correct permissions set for the image. Clear your browser cache and refresh the page.
- • Slow Page Load Times: If your website is slow due to large media files, consider: Compressing images before upload. Implementing lazy loading using plugins like a3 Lazy Load. Removing unused media files to free up space.
- • Broken Links: If you delete a media file that was linked in a post, you’ll end up with a broken link. Regularly check your posts and pages for broken links using tools like Broken Link Checker.
Best Practices for Using the Media Library
Manage WordPress media with a consistent process that improves file organization, page performance, accessibility, content clarity, and long-term maintenance. Every image, video, audio file, and document should have a clear purpose, descriptive information, an appropriate format, and a stable relationship to the page where it appears.
- • Rename files before uploading them. Use short, descriptive filenames such as wordpress-media-library-grid-view.webp instead of generic names such as IMG_2048.jpg. Separate words with hyphens, avoid unnecessary numbers and special characters, and make the filename accurately reflect the file’s visible subject.
- • Write alternative text that explains the image’s purpose in its specific context. Describe meaningful content naturally without repeating nearby text or adding unrelated phrases. Leave the alt attribute empty for purely decorative images so screen readers can skip them. Review these WordPress accessibility tools for additional assistance.
- • Use titles, captions, and descriptions for their intended purposes. The media title helps identify a file inside WordPress, a caption provides visible context or attribution, and a description can store additional information. Avoid automatically copying identical text into every field because each field serves a different function.
- • Choose the correct media format for the content. JPEG is generally suitable for photographs, PNG is useful for transparency and detailed graphics, SVG works well for trusted vector artwork, and WebP or AVIF can reduce image file sizes. Test modern formats with your theme, plugins, browsers, and image-processing workflow before using them throughout the website.
- • Resize media to the largest dimensions actually required by the page layout. Uploading an oversized original and displaying it in a small content area wastes bandwidth and can slow loading. WordPress creates multiple image sizes, so select the thumbnail, medium, large, or another appropriate version when inserting an image.
- • Compress images while preserving enough detail for their purpose. Product photographs, screenshots, diagrams, and logos may require different quality settings. Compare available WordPress image optimization plugins when automatic compression, resizing, WebP conversion, or bulk processing would improve your workflow.
- • Place each media item close to the heading or paragraph it supports. Add a concise caption when the connection is not immediately obvious. Clear proximity between text and visuals helps readers and automated systems understand whether an image is an example, instruction, comparison, result, or decorative element.
- • Reuse existing Media Library files instead of uploading duplicate copies. Duplicate files consume storage, create unnecessary attachment URLs, complicate updates, and make it harder to identify the current version. Follow the WordPress image insertion guide when selecting and reusing previously uploaded media.
- • Avoid deleting media solely because it appears unattached in WordPress. A file marked unattached may still be used by a theme, widget, page builder, custom field, product listing, CSS file, or plugin. Search the website and create a complete WordPress backup before removing files in bulk.
- • Use self-hosted media and third-party embeds deliberately. Hosting images locally provides more control over availability and file details, while video or audio platforms may reduce server storage and bandwidth use. Consider reliability, privacy, licensing, performance, and ownership before choosing between the Media Library and an external image hosting service.
- • Keep important media URLs stable. Replacing or moving a file can break images, downloads, social previews, and links from other websites. When a media URL must change, update every known reference and create an appropriate redirect where possible rather than leaving the previous address unavailable.
- • Add useful metadata to downloadable documents, audio files, and videos. Use a clear title, explain the file’s contents in nearby text, identify the format when helpful, and provide transcripts or summaries for spoken material. This gives visitors enough information to decide whether the media answers their question before opening or playing it.
- • Review mobile display and page performance after publishing. Confirm that media scales without overflowing its container, important text remains legible, captions stay connected to the correct item, and embedded content does not cause layout shifts. Suitable tools from this collection of WordPress performance plugins can assist with caching, lazy loading, and image delivery.
- • Maintain an accurate media inventory. Periodically identify duplicate files, missing alternative text, obsolete branding, oversized uploads, unused documents, broken embeds, and outdated screenshots. Record licensing and attribution details where necessary so future editors can verify whether each asset may still be published.
- • Connect media to relevant supporting content with descriptive links. Link screenshots, diagrams, and downloadable resources to the tutorial or explanation they support rather than using vague labels. Explore the RSH Web Services blog and resource index for additional WordPress, website performance, accessibility, and media-management guidance.
WordPress Media Library Plugins
FileBird
WordPress Media Library Folders and File Manager. Organize thousands of WordPress media files in folders / categories at ease. By Ninja Team
Folders
With the Folders WordPress plugin create unlimited folders, organize and manage your Media Library files, Pages and Posts in folders. By Premio
Media Library Assistant
The Media Library Assistant provides several enhancements for managing the Media Library. By David Lingren
Real Media Library
Organize uploaded media in folders, collections and galleries: A file manager for WordPress. Media management made easy. By devowl.io
Media Library Categories
Adds the ability to use categories in the WordPress Media Library. When activated a dropdown of categories will show up in the media library.
Export Media Library
Allows users to export media library files as a compressed zip archive. By Mass Edge Inc.
Enhanced Media Library
The plugin will be handy for those who need to manage a lot of media files. By wpUXsolutions
Media Library Folders
Easier file and folder management for WordPress Media Library for Galleries and Albums. By Max Foundry
Media Library Enable Infinite Scrolling
A small plugin to re-enable infinite scrolling in the Media Library after WordPress 5.8 is released.
Moving Media Library
Supports the transfer of Media Library between servers. By Katsushi Kawamori
WordPress Resources
Developers WordPress.org
Explore WordPress development with our comprehensive guides and resources. Learn to create themes, plugins, and optimize your site
Security WordPress.org
Discover WordPress security best practices to protect your site. Learn about updates, secure hosting, and essential plugins to keep your content safe from threats
Themes WordPress.org
Browse thousands of free WordPress themes to customize your site’s look. Find the perfect design for your blog, business, or portfolio, and enhance your site’s functionality
Plugins WordPress.org
Unlock your site's potential with thousands of free WordPress plugins! Enhance functionality, improve performance, and add features easily. Explore, install, and elevate your website
Widgets WordPress.org
Discover WordPress widgets to customize your site’s layout easily! Add functionality and content in sidebars and footers without coding
Codex WordPress.org
Explore the WordPress Codex for comprehensive documentation and tutorials. Find guides on themes, plugins, and customization to help you master WordPress
Online Courses WordPress.org
Explore free WordPress courses designed for all skill levels! Learn about themes, plugins, and site management through structured lessons to boost your skills and create stunning websites
Community WordPress.org
Join the WordPress community! Collaborate with passionate contributors, share ideas, and help shape the future of WordPress. Get involved in events, discussions, and projects today
WordPress Resources RSH Web Services
RSH Web Services complete WordPress resources. Our blog helps you find WordPress Resources like optimize your site, improve performance, and master all things WordPress
 Frequently Asked Questions
Why does WordPress create several versions of every uploaded image?
WordPress automatically generates multiple image sizes, such as thumbnail, medium, and large, so themes and browsers can display an appropriate version for each layout. These additional files support responsive images and can reduce unnecessary downloads. However, themes and plugins may create extra sizes, so review your settings before deleting generated images or changing thumbnail dimensions.
Can I replace an image in the Media Library without changing its URL?
WordPress does not provide a complete built-in file replacement feature. Uploading a new image normally creates a new attachment and URL. A media replacement plugin can overwrite the original file while preserving existing links, but you should confirm dimensions, format, and caching behavior first. Create a WordPress backup before replacing files used across many pages.
Why does the WordPress Media Library show blank thumbnails?
Blank or missing thumbnails may result from incorrect file permissions, failed image processing, unsupported formats, plugin conflicts, low server memory, or corrupted generated sizes. Test the original file URL, clear caches, temporarily disable image-related plugins, and regenerate thumbnails if necessary. Also confirm that your WordPress hosting environment supports the image format and required processing library.
How much does it cost to organize or optimize a WordPress Media Library?
The built-in Media Library is included with WordPress at no additional cost. Optional expenses may include premium folder plugins, image compression services, cloud storage, content delivery networks, or professional cleanup assistance. Many sites can begin with free tools and descriptive filenames, then compare WordPress image optimization plugins when automation or bulk processing becomes necessary.
Is it safe to delete images marked as unattached in WordPress?
Not always. An unattached image may still appear in a page builder, widget, theme setting, custom field, product listing, CSS file, or plugin-generated section. Search the website and database references before deleting it. Back up the files and database first, then remove media in small groups and check important pages for missing images or broken downloads.
Should I upload videos directly to WordPress or embed them?
Embedding videos from a dedicated video platform is usually easier on server storage and bandwidth, while self-hosting provides more control over the file and presentation. The right choice depends on privacy, licensing, playback quality, traffic, and hosting resources. For ordinary post images and screenshots, follow the WordPress image insertion guide instead of using video embeds.
How can I make Media Library images easier for everyone to understand?
Add concise alternative text to meaningful images, use captions when visible context or attribution is helpful, and avoid placing essential instructions only inside an image. Decorative images should generally use an empty alt attribute. Also check contrast, mobile sizing, and readable text within graphics. These WordPress accessibility plugins can help identify additional barriers.
Summary
The WordPress Media Library is a powerful tool that simplifies media management for your website. By understanding its features and best practices, you can enhance your site’s functionality, improve user experience, and optimize your content for search engines.
As you become more familiar with the Media Library, you’ll find it invaluable for managing your images, videos, audio files, and documents effectively. Keep practicing and exploring the various features to make the most of this essential tool.
Also see: Using WordPress To Build A Website
Installation with cPanel and Softaculous. WordPress Themes. Changing Themes. Plugins, Creating New Pages. Appearance, Step by step guide, more
Overwhelmed With WordPress?
If WordPress is a bit much try our new AI Website builder and Website Importer
Author Bio: Mira Calden
A WordPress wizard with over eighteen years of experience designing, optimizing, and troubleshooting sites on the world’s favorite CMS WordPress....
Related WordPress Tutorials and How To Guides
Tweet Share Pin Email