Custom Menus
Navigating a website is crucial for a positive user experience, and custom menus play a significant role in helping visitors find what they need. WordPress offers robust menu management features, allowing you to create, customize, and manage menus effectively. This guide will walk you through the entire process of creating custom menus in WordPress, optimizing them for SEO, and enhancing your site's usability.
What are WordPress Custom Menus?
With WordPress, you can create custom menus, which normally serves as a navigation menu for your website.
The built-in WordPress Menu feature allows you to create your own custom menus in place of your theme’s default menus.
Custom menus in WordPress contain links to pages, categories, custom links or other content types. You can also specify a different navigation label for a menu item, as well as assign other attributes.

Benefits of Using Custom Menus
- • Improved Navigation: Custom menus help streamline navigation, making it easier for users to find content.
- • Enhanced User Experience: By organizing content logically, you can improve overall user engagement.
- • SEO Optimization: Well-structured menus can improve your site's SEO by helping search engines understand the hierarchy and importance of your pages.
- • Branding Opportunities: Custom menus allow for more creative freedom, enabling you to align the design with your brand.
How to Access the Menu Settings in WordPress
To get started creating a custom menu, log in to your WordPress website and click to expand the Appearance menu on the left side of the WordPress Dashboard.
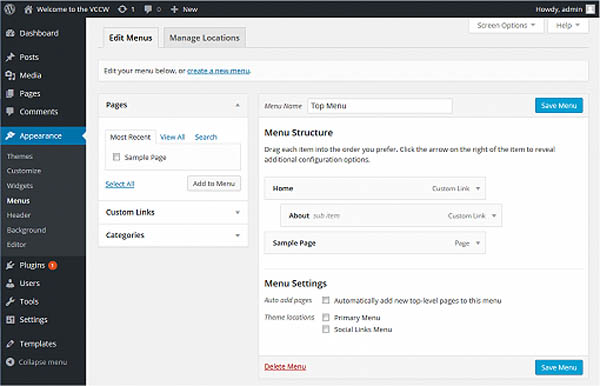
Click on the Menus link in the Appearance menu. You will now see the Menu's editor page.
Creating a Custom Menu
Now, let’s go through the step-by-step process of creating your custom menu.
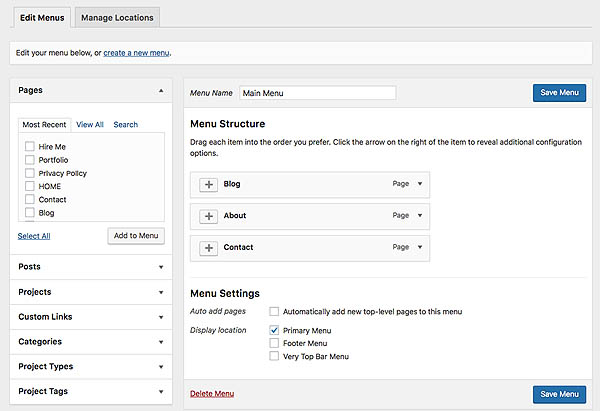
- • Step 1: Create a New Menu: On the Menus page, look for the Edit Menus tab. Click on Create a new menu. Enter a name for your menu (e.g., "Main Navigation") in the Menu Name field. Click the Create Menu button.
- • Step 2: Add Items to Your Menu: After creating your menu, you can add items to it. On the left side of the Menus page, you’ll see several sections, including Pages, Posts, Custom Links, and Categories. To add a page, check the box next to the page name under the Pages section, then click the Add to Menu button. To add a custom link, go to the Custom Links section, enter the URL and link text, then click Add to Menu.
- • Step 3: Organize Menu Items: Once you’ve added items to your menu, you can organize them as needed. Drag and drop the menu items to arrange them in your preferred order. To create submenus, simply drag a menu item slightly to the right beneath a parent item.
- • Step 4: Set Menu Location: After organizing your menu, you need to assign it to a location. Scroll down to the Menu Settings section. Check the box for the location where you want the menu to appear (e.g., Main Navigation, Footer, etc.). Click the Save Menu button.
Customizing Your Menu
With your custom menu created, you can further customize its appearance and functionality.
- • Add Descriptive Titles: Make sure to use descriptive titles for your menu items. This helps both users and search engines understand the content linked to each item.
- • Use Custom CSS: If you want to change the appearance of your menu beyond the default styles provided by your theme, consider adding custom CSS.
Here’s how: Go to Appearance > Customize. Select Additional CSS. Add your custom CSS code and click Publish. - • Include Call-to-Action Buttons: If you have specific goals, such as newsletter sign-ups or product promotions, consider adding call-to-action buttons to your menu. You can do this using custom links that lead to relevant pages.
- • Use Icons: Adding icons next to menu items can enhance visual appeal and improve usability. Use plugins like Menu Icons by ThemeIsle to easily integrate icons into your menus.
Creating A Social Links Menu
You can check if your theme has a location for a Social Menu by going to "Appearance > Customize > Menus > View all Locations".
You will see an option for "Social Menu" or "Social Icons". If your theme does not include a social links menu, you can achieve the same result by adding a Social Icons block.
Follow the below steps to create your social links menu
- • Go to Appearance > Customize
- • Open the "Menus" tab:
- • If you see a "Social" menu. it has already been created, you can open it to begin editing. If not, open "Create New Menu" instead and type in a name, such as “Social Links”
- • Ensure that the checkbox for "Social Links/Icons" is checked under "Menu Locations"
- • To add a social media link to the menu, click "+ Add Items"
- • Select the "Custom Links" menu "Item Type"
- • Fill out the two fields
- • "URL or Address" Add the link address for one of your social media profiles. For example, if the link to your Facebook profile is https://facebook.com/rshweb you would paste that complete address into the URL field.
- • Link Text: Type the name such as Facebook
- • Cick "Add to Menu"
- • Repeat these steps until all the social media profiles you wish to use have been added to the menu
- • Click "Save Changes". Check your website to make sure the icons are showing
Removing a Page in WordPress Menus
If you want to remove a page from a WordPress menu it is fairly easy, navigate back to the WordPress Menu screen Appearance > Menus.
Scroll down to the item you want to delete, click on the arrow to expand it, then select Remove.
Deleting a link from your menu will not delete the actual page, post, or category from your WordPress website. It only removes it from the navigation bar.

Adding Multiple Custom Menus
WordPress allows you to create and manage multiple custom menus for different areas of your site. Here’s how to do it:
- • Create Another Menu: Follow the same steps as above to create a new menu. Give it a different name, such as "Footer Menu."
- • Add Items to the New Menu: Just like before, add pages, posts, custom links, or categories to this new menu.
- • Set Location for the New Menu: Once you’ve added and organized your items, assign the new menu to a different location. Check the appropriate box under Menu Settings and click Save Menu.
- • Repeat for Additional Menus: You can repeat this process to create as many custom menus as needed for different sections of your site.
SEO Best Practices for Custom Menus
Creating a visually appealing custom menu is important, but optimizing it for SEO is crucial for improving your site’s visibility. Here are some best practices to consider:
- • Use Keywords in Menu Titles: Incorporate relevant keywords into your menu titles to help search engines understand your content. This can also improve user experience by clearly indicating the content of linked pages.
- • Prioritize Important Links: Place your most important pages at the top of the menu or in the primary navigation area. This not only enhances usability but also signals to search engines the importance of these pages.
- • Keep It Simple: Avoid cluttering your menu with too many items. A clean and straightforward menu helps users navigate your site easily and improves the overall user experience.
- • Regularly Update Your Menu: As your website evolves, make sure to regularly review and update your menu. Remove outdated links and add new content to keep it relevant.
- • Use Breadcrumbs: Incorporating breadcrumbs on your site helps users navigate back through the hierarchy of pages, providing a better user experience and improving SEO.

Troubleshooting Common Menu Issues
If you encounter issues with your custom menus, consider the following troubleshooting tips:
- • Menu Not Showing: If your menu is not displaying: Check that it’s assigned to the correct location in the menu settings. Clear your browser cache and refresh the page. Review your theme’s documentation to ensure it supports custom menus.
- • Menu Items Not Clickable: If some items are not clickable, it could be due to: JavaScript conflicts caused by other plugins. Deactivate plugins one by one to identify the issue. CSS issues that affect visibility. Inspect the element using your browser's developer tools.
- • Changes Not Reflecting: If changes aren’t appearing: Ensure you clicked the Save Menu button after making changes. Clear your caching plugin or browser cache to see the most recent version of your site.
Custom Menu WordPress Plugins
While WordPress provides robust menu management options, you can further enhance functionality and design with themes and plugins. Many premium WordPress themes come with built-in support for advanced menu customization, allowing you to create more complex and visually appealing menus. Check your theme’s documentation for specific features.
WP Mobile Menu
Need some help with the mobile website experience? Need an Mobile Menu plugin that keep your mobile visitors engaged. By Freshlight Lab
Sticky Menu and Sticky Header
Sticky Menu or Sticky Header sticks elements at the top of the screen when you scroll, or create a floating sticky menu or fixed widget. By WebFactory Ltd
Nav Menu Roles
Hide custom menu items based on user roles. By Kathy Darling
Max Mega Menu
An easy to use mega menu plugin. Written the WordPress way. By megamenu.com
Iks Menu
Super customizable WordPress plugin for displaying custom menus, taxonomy/category terms and FAQs as accordion menu (with images support). By IksStudio
Login Logout Menu
Login Logout Menu is a handy plugin which allows you to add login, logout, register and profile menu items in your selected menu. By WPBrigade
Menu Icons by ThemeIsle
Spice up your navigation menus with pretty icons, easily. By ThemeIsle
Responsive Menu
Highly customizable Responsive Menu plugin with 150+ options. No coding knowledge needed to design it exactly as you want. By ExpressTech
WP Bottom Menu
WP Bottom Menu allows you to add a woocommerce supported bottom menu to your site. By J4 & LiquidThemes
Admin Menu Editor
Lets you edit the WordPress admin menu. You can re-order, hide or rename menus, add custom menus and more. By Janis Elsts
Duplicate Menu
Easily duplicate your WordPress menus with one click. By Jonathan Christopher

Summary
Custom menus are essential for enhancing navigation and improving user experience on your WordPress site. By understanding how to create, customize, and optimize menus, you can make your site more user-friendly and efficient.
Remember to keep your menus organized, update them regularly, and apply SEO best practices to maximize their effectiveness. With the right approach, custom menus can significantly contribute to your site’s overall success.
Also see: Using WordPress To Build A Website
Installation with cPanel and Softaculous. WordPress Themes. Changing Themes. Plugins, Creating New Pages. Appearance, Step by step guide, more
Overwhelmed With WordPress?
If WordPress is a bit much try our new AI Website builder and Website Importer
Author Bio: Mira Calden
A WordPress wizard with over eighteen years of experience designing, optimizing, and troubleshooting sites on the world’s favorite CMS WordPress....
Related WordPress Tutorials and How To Guides
Tweet Share Pin Email