
cPanel - Preferences - Account Preferences
Manage Your Account Settings
Use this interface to update your account preferences, including privacy options and account type.
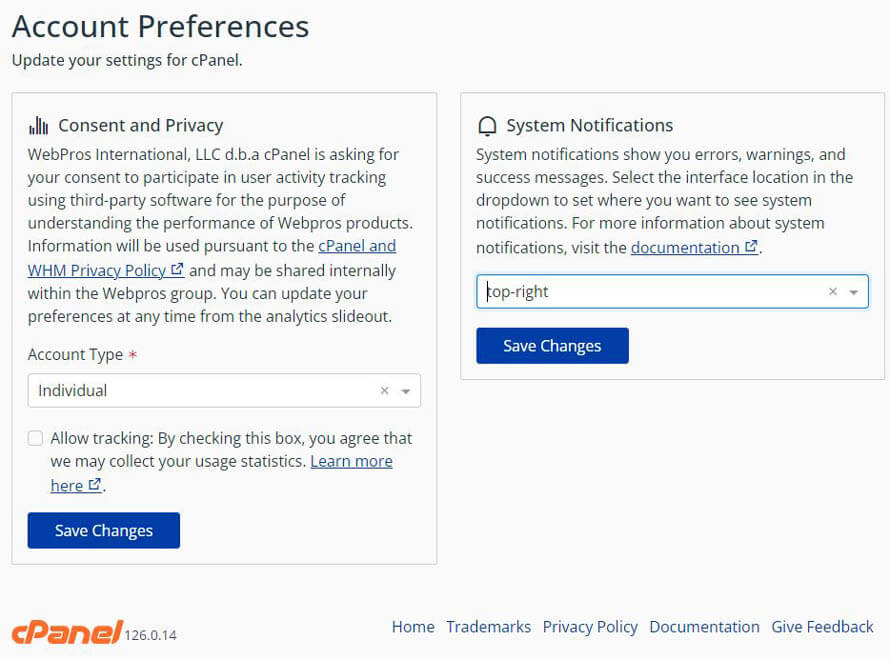
Consent and Privacy
This section allows you to opt in or out of **Interface Analytics**.
- By default, the Interface Analytics plugin is installed but **not enabled**.
- Both the **server owner** and **individual users** must enable the plugin for data collection to begin.
- Data is only collected based on settings chosen at both the server and account levels.
Account Type
Specify whether your account is for an **individual** or a **business**:
1. Choose your preferred type from the **Account Type** menu.
2. Click **Save Changes** to apply your selection.
| Server level | Account level | Interface Analytics |
|---|---|---|
| Yes | Yes | Enabled |
| Yes | No | Disabled |
| No | Yes | Disabled |
| No | No | Disabled |
To enable Interface Analytics, select the Allow Tracking checkbox. To disable Interface Analytics, clear the checkbox. Then, click Save Changes.
System Notifications
This function sets where on the screen that system notifications appear. To change the location of your system notifications, select a location from the menu and click Save Changes.
Note:This setting applies to every page on which a notification appears. The location of system notifications defaults to the top right of the screen. The middle-middle selection will create an overlay for the screen. Press Esc or click the X icon to close the notification.
Change language
To change your cPanel interface’s language, perform the following steps:
Select the language that you wish to use from the Language menu.
Click Save Changes. A success message will appear.
Supported languages
Note: We have deprecated our legacy locales. For more information, read the cPanel Deprecation Plan.
We support the following languages:
English
German
Indonesian
Japanese
Portuguese
Russian
Spanish
Turkish
*Note:* Legacy locales are deprecated. See the [cPanel Deprecation Plan](https://docs.cpanel.net/) for more details.
Related cPanel Tutorials and How To Guides
Tips and tricks on how to better optimize your cPanel
Tweet Share Pin Email
Add Comment
This policy contains information about your privacy. By posting, you are declaring that you understand this policy:
- Your name, rating, website address, town, country, state and comment will be publicly displayed if entered.
- Aside from the data entered into these form fields, other stored data about your comment will include:
- Your IP address (not displayed)
- The time/date of your submission (displayed)
- Your email address will not be shared. It is collected for only two reasons:
- Administrative purposes, should a need to contact you arise.
- To inform you of new comments, should you subscribe to receive notifications.
- A cookie may be set on your computer. This is used to remember your inputs. It will expire by itself.
This policy is subject to change at any time and without notice.
These terms and conditions contain rules about posting comments. By submitting a comment, you agree with these rules:
- Although the administrator will attempt to moderate comments, not all comments can be moderated at all times.
- You acknowledge that all comments express the opinions of the original author and not those of the administrator.
- You will not post material which is knowingly false, obscene, hateful, threatening, harassing or invasive of privacy.
- The administrator has the right to edit, move or remove any comment for any reason and without notice.
Failure to comply with these rules may result in being banned from submitting further comments.
These terms and conditions are subject to change at any time and without notice.
 Newest Trends in Website Designing For Inspiration
 Building a Website from Scratch, CMS or Template
 6 Essential Features for a Scalable Online Shop
 10 Reasons To Invest In Your Website Design
Comments