cPanel - Domains - WordPress Toolkit
One-click installer to initialize and configure WordPress from start to finish. One dashboard to mass-manage multiple WordPress instances. The WordPress Toolkit plugin from cPanel allows you to easily install, configure, and manage WordPress
WordPress Management
WP Toolkit is a single management interface you can use to create, configure, and manage WordPress websites
Installing WordPress
To install a new WordPress installation, go to WP Toolkit and click Install.
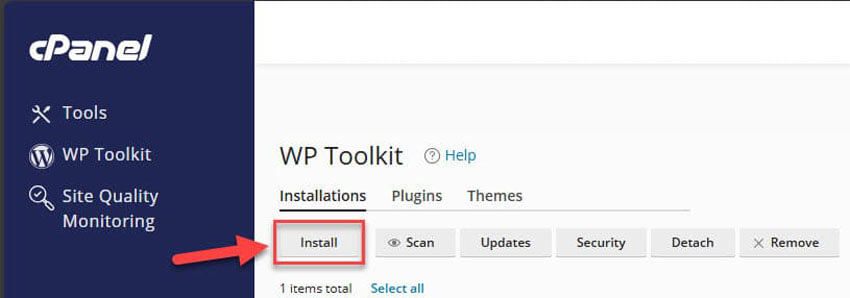
Here you can:
Install the latest version of WordPress with the default settings by clicking Install.
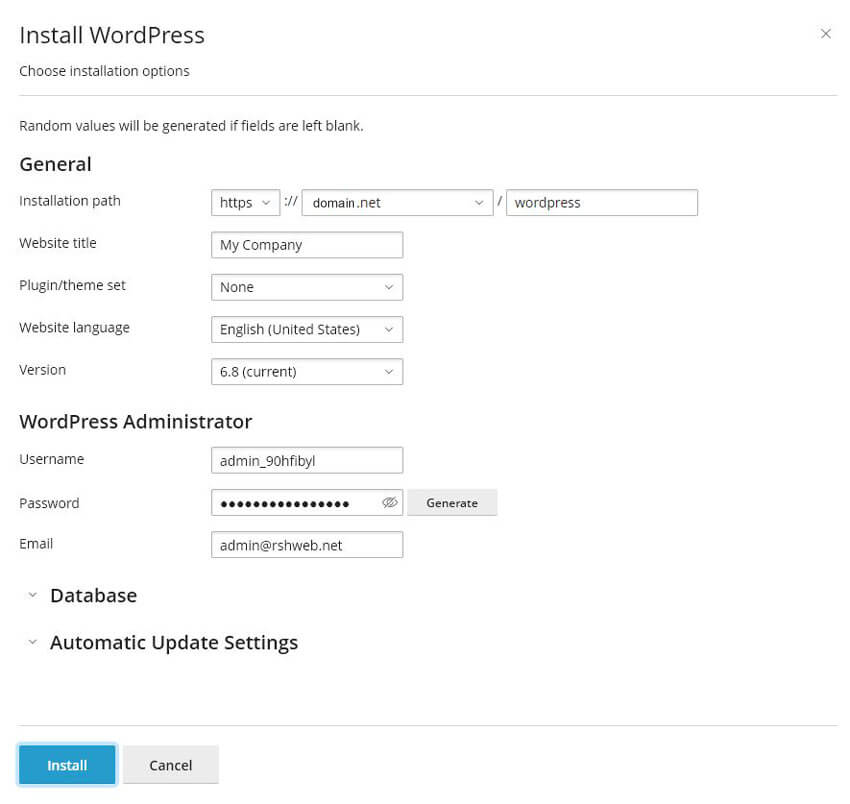
Change the default settings (including the desired WordPress version, the database name, the autoupdate settings, and more) and then click Install.
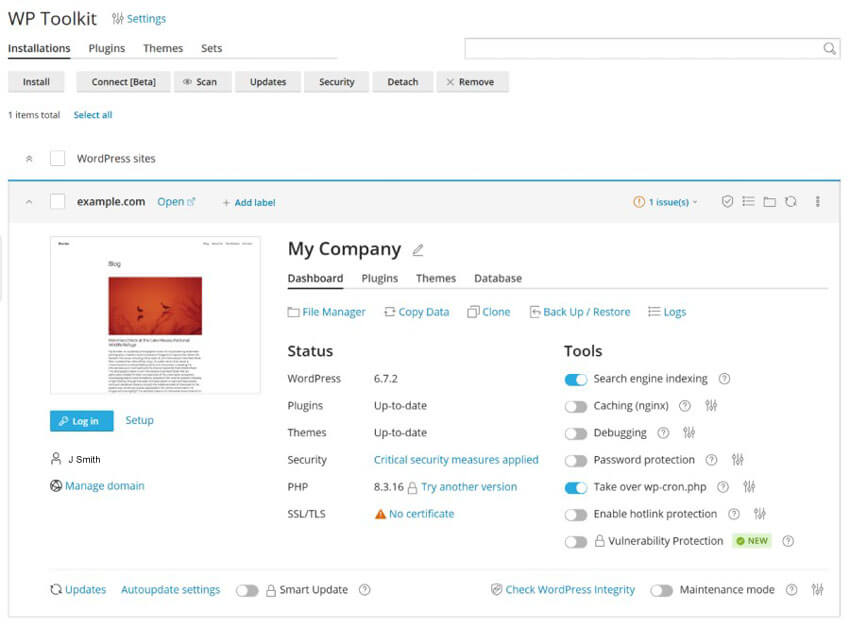
WP Toolkit Installations Tab
Here you can see your WordPress installations
Options are:
Install, Scan, Updates, Security, Detach, Remove
Also you can find the "Smart Update" button which is a smart way of check for problems:
"Smart Update tests WordPress updates without affecting the production site. It clones your site, updates the clone, and runs a number of checks to see if updates have broken anything. You can review test results and check the test site itself to make an informed decision about updating your production site."
WP Toolkit PluginsTab
Here you can see the list of all plugins installed on your WordPress installations.
Options are:
Install, Upload Plugin, Activate, Deactivate, Uninstall, Update
WP Toolkit ThemesTab
Here you can see the list of all themes installed on your WordPress installations.
Options are:
Install, Upload Theme, Uninstall, Update
File Manager
To manage the website’s files in File Manager see our File Manager section
Copying Data from One WordPress Website to Another
To copy data of one WordPress website to another:
Go to WordPress and then click “Copy Data” on the card of the WordPress installation which data you want to copy.
Next to “Target”, select the target WordPress installation (under the same or another subscription) you want to copy the data to.
Under “Data to Copy”, select which data you want to copy to the target WordPress website:
“Files Only” - copies only the website files, including the WordPress core files and the files related to themes and plugins.
“Database Only” - copies only the database. You can select to import all, new, or selected database tables.
“Files and Database” - copies both the website files and the database. You can choose to import all, new, or selected database tables (for details, see step 5 below).
If you selected “Files Only” or “Files and Database” during step 3, two more options become available:
“Replace files modified on target” - by default, if a file with the same name exists both on the source and the target, the file from the source will be copied and will replace the file on the target even if the source file is older. To prohibit overwriting files on the target with the files from the source that are older clear the checkbox.
“Remove missing files” - by default, if a file exists on the target but is missing from the source, the file is untouched. Select this checkbox to remove files on the target that are missing from the source.
If you selected “Database only” or “Files and Database” during step 3, select which database tables you want to copy:
“All Tables” (the default option). If you want to copy all changes except for pages, posts, and users, keep the “Except: _postmeta, _posts, _usermeta, _users” checkbox selected.
New tables only
Selected tables. Click “Select tables to copy”, select those tables you want to copy, and then click Select.
Before copying data, WP Toolkit suggests creating a restore point. You can use it to roll back the changes made during copying. If you do not want to create a restore point, clear the “Create a restore point” checkbox.
Learn how you can recover your WordPress installation using the restore point in “Restoring a WordPress Installation” section below.
When you are satisfied with the selected options, click Start to start copying data
Cloning a WordPress Website
Cloning a WordPress website involves creation of a full website copy with all website files, the database, and settings.
To clone a WordPress website:
Go to WordPress and then click “Clone” on the card of the WordPress installation you want to clone.
Choose the target where to clone the website:
Select “Use existing domain or subdomain” and then select the desired domain or subdomain from the list.
(Optional) Change the name of the database automatically created during cloning.
When you are satisfied with the selected target and the database name, click Start.
When the cloning is finished, the new clone will be displayed in the list of WordPress installations.
To back up a WordPress website:
Go to WordPress and then click Back up / Restore on the card of the WordPress installation you want to back up.
Click Back up.
Once the backup is finished, it will be displayed in the list of WP Toolkit backups.
To restore a WordPress website:
Go to the Back up / Restore on the card of the WordPress installation whose backup you want to restore.
Click the image icon restore icon corresponding to the backup you want to restore.
Click Restore.
You have restored your backup.
To be on the safe side, you may want to download WP Toolkit backup files to store them elsewhere.
WordPress Toolkit includes everything you need to take control of your WordPress websites. There is no limit to the number of WordPress websites you can manage with WordPress Toolkit.
YouTube Video Tutorials - cPanel WordPress Toolkit
The "cPanel WordPress Toolkit" YouTube video tutorials introduce users to managing WordPress installations directly from cPanel. Viewers learn how to install, update, and secure their WordPress sites, as well as manage themes and plugins efficiently. This toolkit simplifies site management, making it ideal for both beginners and experienced users.
The Toolkit is a WordPress management script. It has an easy-to-use interface that allows users to install, configure, secure, update, and manage all of their WordPress sites. Users can implement it with cPanel as a replacement for the cPanel WordPress Manager.
WordPress Articles from RSH Web
What is the Functions File in WordPress
WordPress Optimization Plugins
Worst WordPress Hacks During the Pandemic
WordPress Multilingual Plugins
Real Estate Plugins for WordPress
Categories and Tags in WordPress
cPanel Tutorials and How-To Articles
Finding your way around your cPanel hosting account
Tweet Share Pin Email
Add Comment
This policy contains information about your privacy. By posting, you are declaring that you understand this policy:
- Your name, rating, website address, town, country, state and comment will be publicly displayed if entered.
- Aside from the data entered into these form fields, other stored data about your comment will include:
- Your IP address (not displayed)
- The time/date of your submission (displayed)
- Your email address will not be shared. It is collected for only two reasons:
- Administrative purposes, should a need to contact you arise.
- To inform you of new comments, should you subscribe to receive notifications.
- A cookie may be set on your computer. This is used to remember your inputs. It will expire by itself.
This policy is subject to change at any time and without notice.
These terms and conditions contain rules about posting comments. By submitting a comment, you agree with these rules:
- Although the administrator will attempt to moderate comments, not all comments can be moderated at all times.
- You acknowledge that all comments express the opinions of the original author and not those of the administrator.
- You will not post material which is knowingly false, obscene, hateful, threatening, harassing or invasive of privacy.
- The administrator has the right to edit, move or remove any comment for any reason and without notice.
Failure to comply with these rules may result in being banned from submitting further comments.
These terms and conditions are subject to change at any time and without notice.
 How to Keep Your Website Safe from Cyber Threats
 How to Fix SSL or HTTPS Warnings
 Why Is Website Security Important?
 HTTP vs HTTPS: Understanding the Key Differences
Comments (1)
Nice update, thanks RSH