cPanel - Metrics - Site Quality Monitoring
Website Quality Monitoring
The Site Quality Monitoring feature helps you track websites for common issues like low SEO rankings and performance concerns. It includes the following tabs
| Tab | Description |
|---|---|
| Crawling | The Crawling tab contains the Dead links, Missing images and files, and Oversize files tabs. |
| Extras | The Extras tab contains the Integrations tab, as well as the configuration tab for some monitoring extension you configure through the Integrations tab. Important: This tab only appears if your hosting provider enables Site Quality Monitoring subscriptions. For more information about subscriptions, read cPanels How to Manage a Site Quality Monitoring Subscription documentation. |
| Monitoring | The Monitoring tab contains the Availability, Performance, SEO, Content, Technical, and Security tabs. |
| Settings | The Settings tab contains the Monitored website manager, Monitored URL manager, and Configure email alerts tabs. |
| Website Summary | The Website Summary tab contains the Rating, Current findings, and Past findings tabs for your monitored website. |
Requirements
To see the Site Quality Monitoring feature, you must meet the following requirements:
| Requirement | Description |
|---|---|
| cPanel & WHM version | This feature is only available in cPanel & WHM version 110 or version 116 and later. For more information, read cPanel's Site Quality Monitoring Release Notes documentation. |
| Sign-up process | To use this feature, you must first complete the sign-up process and choose an initial subscription type. To do so, follow all instructions in the interface. |
| Hosting provider enablement | This feature only appears if your hosting provider enables it. If you do not see this feature in the cPanel interface (cPanel » Home) when you should, contact your hosting provider. |
Color indicators
The Site Quality Monitoring feature includes color indicators. These color indicators reflect the presence of monitoring check errors and failures in the following ways:
| Color | Description |
|---|---|
| Green | Your monitored website has passed all monitoring checks in this category. |
| Yellow | Your monitored website has non-critical errors or failures in this monitoring check category. |
| Red | Your monitored website has critical errors in this monitoring check category. |
Error types
The Site Quality Monitoring feature divides common website errors into types based on their severity. The feature uses the following error types:
| Error type | Description |
|---|---|
| Critical | Errors in this category prevent users from accessing or interacting with a monitored URL or website. |
| Non-critical/Moderate | Errors in this category degrade user experience, but do not prevent users from accessing or interacting with a monitored URL or website. |
Scores
The Site Quality Monitoring feature assigns scores from 0 to 100 to judge your website’s response to monitoring checks. A higher score indicates that your root domain or URL performs well in that category of monitoring checks. For example, a monitored website with an Availability score of 100 in the left navigation menu is highly available. The monitored website’s users will be able to send requests to the website and receive an appropriate response quickly and efficiently.
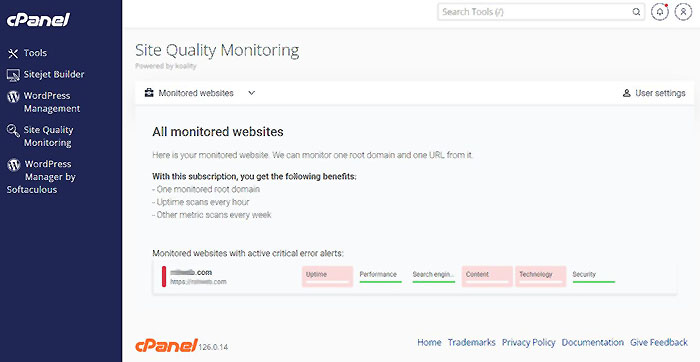
All monitored websites
The All monitored websites section allows you to access an overview of all your monitored websites, see your unassigned subscriptions, and add new monitored websites.
The monitored website overview list
If any of your monitored websites have critical error alerts, we will display them with the Monitored websites with active critical error alerts: label. Otherwise, we will display them with the Monitored websites without active critical error alerts: label.
Your monitored website will be displayed with its title, monitoring section health bars, and its subscription type. These health bars are color indicators.
You can hover over a monitoring check category’s health bar to view a score and a color indicator for specific checks within that monitoring check category.
To access your monitored website’s monitoring information, click its title. You can also click a monitoring check category or specific check to open their sections.
Opening the Site Quality Monitoring feature opens this section. To return to this section once you have exited it, click Monitored websites in the top navigation bar to open the list of your current monitored websites. Then select All monitored website + Monitor new website to re-open this section.
Once you select a specific monitored website from this section, the left navigation bar will appear.
The left navigation bar includes a monitored website’s Website Summary, Monitoring, Crawling, and Settings tabs.
Unassigned subscriptions
We display your number of unassigned subscriptions in the You have number unassigned subscription(s) label above the Monitor new website button, where number represents your unassigned subscriptions.
When you upgrade a monitoring subscription or downgrade a website’s subscription without cancelling it, Site Quality Monitoring unassigns the subscription, but keeps it active so that you can assign it to another monitored website. For example, when you upgrade your monitored website on a Free subscription, we will unassign your Free subscription, but keep the subscription available to you. Therefore, when you upgrade a monitored website with a Free subscription to use another subscription type, this label will display You have 1 unassigned subscription.
For more information about how to manage your monitored website’s Site Quality Monitoring subscription, read cPanel's How to Manage a Site Quality Monitoring Subscription documentation.
Add a new monitored website
To add a new monitored website to Site Quality Monitoring, click Monitor new website. The Ready to monitor a new website? menu will appear.
Ready to monitor a new website?
To add a new monitored website to Site Quality Monitoring, you must first select its subscription type. If you have an unassigned subscription, you may click Activate to attach it to your monitored website. Otherwise, click Purchase under your desired subscription. A payment window will appear.
Once you have followed the instructions there to purchase your subscription, we will return you to the All monitored websites section. The Monitor new website menu will open.
Monitor new website
To add a new monitored website to Site Quality Monitoring, enter the following information into the menu:
- Monitored website name* — The display title for your monitored website.
- Subscription type — Your subscription type.
- Location* — Select the location nearest to your monitored website’s server.
- Protocol — Your monitored website’s protocol.
- Domain — Enter your root domain here. Your root domain is a combination of your domain name and the top-level domain.
- Email alerts — Select one of the following options:
- Standard alerting — Site Quality Monitoring will email the address you signed up with immediately upon detection of a critical error. It will also email you daily about non-critical errors or critical errors that you have not yet fixed.
- None - Site Quality Monitoring will not email the address you signed up with to report error alerts.
Click Save to begin monitoring your new monitored website.
The monitoring check countdown bar
The top navigation bar of the Site Quality Monitoring feature contains a monitoring check countdown bar. When the countdown reaches 0 days 0 hr. until next check, the Site Quality Monitoring feature will perform the next round of monitoring checks. These check results appear in the Monitoring tab. For more information about these checks, read cPanel's Site Quality Monitoring — Monitoring documentation.
When the monitoring check round completes, the countdown resets.
Note:
- This bar is not a color indicator.
- If the top navigation bar shows that Data is being collected, then the Site Quality Monitoring feature is currently performing a round of monitoring checks. It will reset the countdown when the monitoring check round is complete.
- You must run each crawl in the Crawling tab manually. For more information about how to use the Crawling tab, read cPanel's Site Quality Monitoring — Crawling documentation.
Upgrade subscription
Once you have selected a monitored website from the All monitored websites section, an Upgrade subscription button will appear in the top navigation bar of the Site Quality Monitoring feature if you can upgrade that project’s subscription.
To upgrade a monitored website’s subscription, click the monitored website subscription label. The Ready to upgrade your subscription? menu will appear.
Warning:
You cannot upgrade any subscription except for a Free subscription. For more information about how to manage a subscription, read cPanel's How to Manage a Site Quality Monitoring Subscription documentation.
Ready to upgrade your subscription?
The Ready to upgrade your subscription? menu displays your monitored website’s current subscription type and available subscription types.
To activate an available Free subscription, click Activate.
To upgrade to your current monitored website’s monitoring to use a paid subscription, select the subscription type you want to upgrade to, then click Upgrade. A payment window will appear. Follow the instructions there and click Subscribe to upgrade, or click WebPros/Back to return to the All monitored websites section.
For more information about subscription types, read cPanel's How to Manage a Site Quality Monitoring Subscription documentation.
User settings
The User settings section allows you to adjust the Site Quality Monitoring feature’s timezone. It also allows you to delete your Site Quality Monitoring account.
To navigate to the User settings section, click User settings in the top navigation bar. The section will open.
To edit the timezone for the Site Quality Monitoring feature to use, click Timezone. Select your preferred timezone in the Timezone menu.
To manage your current monitored website’s subscription, click Manage subscription. If you do not have an active subscription or your hosting provider has disabled subscriptions, the section will display a No active subscriptions found. message. If you do have active subscriptions, the section will display all your subscriptions with the following options:
- Cancel — Click this to open the Cancel subscription menu. Click Cancel subscription within this menu to cancel your Site Quality Monitoring subscription.
- Monitor new website — If you have a subscription that does not have an associated monitored website, you may click Monitor new website. You will return to the All monitored websites section and the Monitor new website menu will appear. Enter the website information that you want to monitor and click Save to begin monitoring it with that subscription’s capabilities.
To remove your information from the Site Quality Monitoring feature, click Remove your information from Site Quality Monitoring.
To exit this section, click Back to Monitored Website
See our WHMCS cPanel Knowledgebase add-on module for Hosting Companies
cPanel Tutorials and How-To Articles
Finding your way around your cPanel hosting account
Tweet Share Pin Email
Add Comment
This policy contains information about your privacy. By posting, you are declaring that you understand this policy:
- Your name, rating, website address, town, country, state and comment will be publicly displayed if entered.
- Aside from the data entered into these form fields, other stored data about your comment will include:
- Your IP address (not displayed)
- The time/date of your submission (displayed)
- Your email address will not be shared. It is collected for only two reasons:
- Administrative purposes, should a need to contact you arise.
- To inform you of new comments, should you subscribe to receive notifications.
- A cookie may be set on your computer. This is used to remember your inputs. It will expire by itself.
This policy is subject to change at any time and without notice.
These terms and conditions contain rules about posting comments. By submitting a comment, you agree with these rules:
- Although the administrator will attempt to moderate comments, not all comments can be moderated at all times.
- You acknowledge that all comments express the opinions of the original author and not those of the administrator.
- You will not post material which is knowingly false, obscene, hateful, threatening, harassing or invasive of privacy.
- The administrator has the right to edit, move or remove any comment for any reason and without notice.
Failure to comply with these rules may result in being banned from submitting further comments.
These terms and conditions are subject to change at any time and without notice.
 What is cPanel? Complete Beginners Guide of Features
 What Is the .htaccess File? Your Complete Guide
 Importance of Maintaining Your WordPress Database
 Ultimate Guide - Best Free Image and Photo Resources
Comments